
In the months before my wedding, I periodically suggested I might like to make our wedding cake (because most giant wedding cakes are terrible) and was swiftly shot down by everyone who heard it. “You’re crazy.” “It’s too much work.” “Do you want to spend your Special Day covered in frosting?” And so I relented and our wedding cake tasted like processed awfulness and it bothered me so much that I volunteered to make the wedding cake for friends a few years later, in 2008. At the end of this fun but exhausting endeavor, I declared the accounting of terrible and wonderful wedding cakes in the universe to be infinitesimally more in balance and making wedding cakes to be “completely out of my system.” That lasted about nine years, when one of my oldest and favorite-est friends got married in 2018. However, I waited completely until the last minute to start it and while we loved it in the end, the absolutely-my-fault stress/chaos of the project definitely set the clock back on me making another wedding cake for at least another nine years. But a mere year and a half later, another fabulous friend got engaged to another wonderful guy and that brings us up to a couple weeks ago: wedding cake three. Three wedding cakes in, I’ve learned a lot of stuff that doesn’t fall in your usual wedding cake baking guide and since I’m definitely never making another wedding cake (“I mean it this time!” I say with such thin resolve it’s clear even I don’t buy it anymore), I think we should start here.

How to | Cake Details | Recipes | Buttercream Flower Garden
How to really make a wedding cake
1. First, a reality check. Here’s the thing: Baking a delicious cake for people you love is not hard; it’s very doable and lovely and even feels good. Baking a cake to feed an entire wedding reception is a whole other thing. It is a logistical challenge that few home kitchens have been designed to accommodate, let alone city kitchens with a single counter, small oven and fridge. As soon as the headcount is over 80 people, you’re likely looking at a tier that’s 14 inches, which is larger than small city ovens can fit, and the absolute outer limit of the Whirlpool masterpiece my building has graced my kitchen with. Each layer of a 12-inch cake may fill a 5-quart KitchenAid bowl, so you’ll make each as a separate cake recipe. And that’s just the tip of the iceberg.
Things happen that if you were a baker at a bakery who did this all day, would be a small inconvenience but at home can be utterly derailing. I curdled a dozen-egg batch of custard on my second wedding cake (and yes, of course I didn’t have a dozen eggs to spare). On this third one, I realized the cake was shrinking more than I’d expected at larger sizes (don’t worry, I’ve since fixed the recipe), meaning that once trimmed my 12-inch tier was more like 10-inch and… woefully short on servings, leading to a bonus day of baking 14-inch layers and just so many (fine, three) gray hairs. Ovens break, stand mixers break — it’s all happened to me. There hasn’t been a single Wedding Cake Week in which I haven’t fallen behind in every other area of my life.
This doesn’t mean I regret any of them. There are lots of reasons to do it anyway: To see the shock and surprise and delight on people’s faces when they bite into a cake that actually tastes like a dream. Because (once your kitchen has recovered) you’ll admit that it’s more fun than buying a place setting of china. Because you’re only going to do it once and then it will be out of your system — just like me (wink).
Since I have failed to dissuade you…
2. Figure out your cake sizes. How many guests will the cake need to serve? Does the couple want to take the top tier home for their anniversary cake? Sort these first. Take a look at cake serving guides online (Wilton has some good ones). You’ll see terms like Wedding Cut and Party Cut and be perplexed, so let me break it down for you. Regular layer cakes (“party cakes”) are shorter, usually 3 inches tall with frosting and filling. Imagine the grid/cutting guide from the top of the cake, looking down. A 2-inch by 2-inch slice — aka “party cut” — is generous. A wedding cake tier or is usually much taller, often 4″ to 4.5″” (but seriously, 4″ is really perfect and 5″ won’t fit on a lot of dessert plates). When cut into 1″ by 2″ slices (“wedding cut”), it’s not ungenerous; it’s, in fact, perfect. So, you get a lot more servings per cake.
Two really key things, though: One, don’t assume anyone cutting the cake knows how wedding cakes are supposed to be cut, no matter how many weddings have been hosted there. Print a guide out and bring it, explain it, and save yourself a lot of mental distress because the alternative is that slices come out too big, nobody finishes them, and then there’s not enough cake, adding insult to injury. Second, account for error. If you’re doweling the cake so it can be stacked, each of those dowels will cost you a slice or so. You want to plan for 20 extra slices, to play it safe. Besides, your cake will be amazing and people will want seconds.
I know you already know to do this (don’t you?) but please, make sure your oven can fit the pan size you want to use. If your wedding requires a 16-inch cake, it’s simply not going to come out of most home kitchens.
3. Settle on flavors. The first wedding cake I made was half chocolate with chocolate filling and half vanilla cake with mango curd filling and I made enough that each guest could try both. The second cake was a german chocolate cake. And here, my friends said they like salted caramel, brown butter, and vanilla. Figure out how you want to execute them — what kind of cake layers, what kind of filling, and frosting will best exhibit the flavors the couple loves. Nominate some recipes to audition.


4. Make a test cake. I usually use a 6-inch round cake to create a test cake but I make it in full, with however many layers and whatever kind of frosting the final wedding cake will have. Do as many test cakes as needed; there is absolutely no hedging on this. You must see and taste how it comes together. You must see if the layers plus the filling and frosting make the height you’d like the tiers to be. You want to see if the cakes shrink in the oven and how much; perhaps you’ll need larger ones. Smooth out your processes. Talk to friends who are good bakers, or make new ones. They may be able to offer you invaluable advice. (More on this later.) Get the proportions, flavors, and size right on your small cake, then scale it up for the entire cake size.
5. Create your final recipes. I don’t scale cakes by cups of batter, but by the area of the bottom of the cake. The reason I only use two-dimensional area and not three-dimensional volume is that I want my cake layers to stay the same height even as I change the size of the pan they’re in — i.e. I want each tier to be the same height, even if the cake diameters are different. The way we find area of squares and circles has not changed since grade school (but the calculators on our phones sure makes it easier). A 6-inch round pan has a base area of about 28 inches. A 9-inch has 64. A 12-inch, 113. It’s not perfect math, but I use these as a guide and put double the amount of batter in a 9-inch pan as I do in a 6-inch, and double it again for a 12-inch. Figure out what you’ll need for the cake pans you’ll use.
Don’t worry about ending up with funny numbers as you scale up or down, like 1.33 eggs. You can decide how you want to handle it (i.e. beating an egg and pouring in one-third of the mixture or just adding a single extra yolk) as you go. I’m more concerned about scaling up incorrectly, i.e. if you round the 1.33 eggs down to 1 egg and then multiplying it by 6 for a larger cake, you’d end up with 2 fewer eggs and possible, a different cake.
Fact: Cake math is the best math.
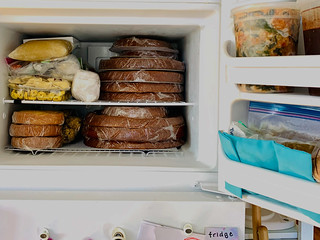
6. Find a schedule that works for you. Know how far in advance you can work based on how long each part of the cake will keep at peak quality. Cake layers, tightly wrapped in a couple layers of plastic, will be good for 1 to 2 weeks (and longer, but hey, fresh is the goal) in the freezer. The salted caramel filling we’re making here is good for two weeks, easily, in the fridge. The custard base for the frosting, easily 4 days. Figure out what order you want to make it in and what you’ll do with the parts until you’ll need them.
Always build in an extra day or two. If you’re on schedule, go take a nap. If you hit a snag you’ll be glad you have a “slush fund” in your schedule. Know what kind of baker you are. Some people go for it — start the morning of the day before the wedding. But I lack that stamina and don’t want to be tired when my focus is needed the most. I prefer to do a little each day; I prefer to be done at least half a day before I deliver it, especially if you’re also a guest at the wedding, wouldn’t it be nice to arrive without buttercream in your hair and a vacant expression in your overtired eyes? Find out who to connect with (i.e. not the bride(s)/groom(s), leave them alone on their wedding day) to deliver the cake and when they can accept it, and schedule your time backwards from there.

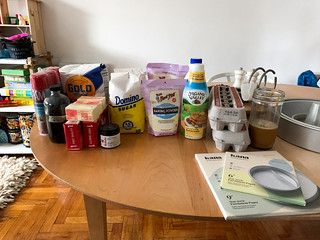
7. Buy all the materials and ingredients you need. What kind of materials? A box to transport the cake in (and remember, it should fit the cake board size, not the cake itself). A drum (thicker, more decorative cake board) that it might sit on. I find having several extra plain cake circles helpful when I need to stack the layers without bending their shapes, as well to move the cake layers around. Will your cake require dowels? Kits are inexpensive and easy. Think you’ll need a cake cone or core for a larger layer? (Read more about them here).
This is not the time to skimp on things that will make your life easier. My 12 year-old serrated knife was pretty dull; I bought this new one to easily zip through layers. I needed a whisk that would better reach into the corners of pans for the caramel and custard and bought a small and large of this (it was sold in a set at the time. I have used them almost every day since, and not just for baking.) Pre-cut parchment rounds to line pans are worth every penny (these came in a nice folder, making storing extras neater). I bought a sturdy revolving cake decorating stand after borrowing one for my first wedding cake and am glad I did.
Then, shop for ingredients, either online or locally. I like to buy extra of everything, but not so much that I (ahem) am shamed by my cabinet, finding bags of expired coconut years after the wedding cake that used them. But I also live in a big city with several grocery stores in a few block radius; you do you. Go to the big box stores for reasonably priced butter, eggs, and more, if you have access to them. A few good things to know: A 5-pound bag of flour contains about 17 cups of flour. A 4-pound bag of sugar contains about 9 cups of sugar. A pound of butter is 2 cups; European packs of butter are usually half a pound or 1 cup but sometimes they’re an even 500 grams, which is a tablespoon or two more.
I bought a couple extras this time: a highly concentrated vanilla bean paste that came with glowing recommendations for the frosting (vs. procuring and opening a dozen vanilla beans) and I bought some milk powder, so I could make extra-toasty brown butter. (More on this in a bit.)
People often ask when it’s worth it to use extra-amazing ingredients and when it’s not. Here, I used three different kinds of butter. I found that in the cake layers, I could make browned butter from any basic butter and it was great. For the caramel, I used a salted European-style butter, but I do think basic salted butter probably would have been fine, too. For the frosting, I also used a European-style butter because it’s so butter-forward, the improved flavor is worth the splurge.

8. Get to it. Don’t worry; you’ll never question (or let anyone question) why bakery wedding cakes cost so much again.
Let’s talk about this cake
There are 61 one Celebration Cakes on this site and another dozen over my two cookbooks, and yet this is one of my favorite cakes I have ever made. To understand what makes this one amazing, it helps to consider what makes classic wedding cakes mediocre. Classic, very traditional wedding cakes are white cakes (you know, because white = “purity” aiee), and white cakes are often made with egg whites only, which yields a lightweight but somewhat sturdy/firm cake that is very easy to work with while maybe not tasting as wonderful as your favorite golden-hued birthday cake. Fillings can be more “interesting” along the lines of lemon curd or raspberry puree, but the frosting usually goes back to a pure white color, and for this Swiss or Italian meringue buttercream are the standards. They’re buttery, not very sweet, and pipe like a dream. They’re not, however, terribly exciting. The best case scenario for any of these elements would be top-notch ingredients but it’s unlikely that bakeries cranking out loads of wedding cakes are able to do it with a, say, Kerrygold budget.
This cake takes each of these classic elements and betters them, turning what could be basic into layers upon layers of nuanced flavors.


Cake layers: Each tier (although these were not stacked) is three layers of tender vanilla cake fragrant with brown butter. Brown butter is created by melting butter and continuing to cook it until any water content evaporates and the remaining liquid separates into butterfat and milk solids. The milk solids toast and become nutty and fragrant. Still, it’s a mild flavor and can be hard to get it to “show up” in a cake. To amplify it, I employed a technique in which you add additional milk solids in the form of powdered milk to the melted butter. Here, I added 1 tablespoon milk powder to each 1/2 cup of butter.
Because these cake layers are on the plush, fluffy side, I reverse-creamed them on the advice of Erin Clarkson, the talented baker behind Cloudy Kitchen. You can read more about reverse creaming here, but in short, it leads to flatter tops and a more even, plush crumb, making it more desirable for big layer cake projects.
I baked these cake layers at 325 degrees F (versus the usual 350F), which led to flatter tops, less shrinking in the pan, and a more even golden color all over.


Filling: I think that a real, proper salted butter caramel sauce is a revelation to taste, and I wanted nothing short of this stop-you-in-your tracks deliciousness for the filing here. I aimed for a caramel that that was softer than a caramel candy (which, of course, would be a bit chewy) but firmer than a sauce (which would be runny and difficult to contain). I found that my go-to salted butter caramel sauce cook to about 245 degrees F did the trick perfectly. From the fridge in a bowl, it’s hard to scoop. Warmed up to room temperature, once it’s spread thin, it stays in place when the cake is slices but begins to trickle down the cake sides a couple minutes later, which I considered ideal.
Clarkson suggested that to keep the caramel from soaking into the cake, or even trying, I coat each cake with a thin layer of the frosting. I also piped a “dam” around — a ring of frosting that would ensure that the caramel wouldn’t trickle out the sides at any point. I got both cold enough that they were solid before filling the top with caramel.
I love sea salt flakes in caramel, but I find they don’t disperse reliably throughout the caramel and I didn’t want some slices to be very salty and some not salty enough. To avoid this, I used salted butter, which of course fully distributes but has a very subtle saltiness. After spreading the caramel, I sprinkled it evenly with sea salt flakes before putting the next cake layer on top.


Frosting: Over the years, I’ve made so many delicious frostings but I couldn’t decide which one would be a real show-stopper here, and not just a pretty coating. Clarkson urged me to try a new-to-me frosting, German buttercream. German buttercream, or whipped vanilla custard frosting, is exactly that — a vanilla bean custard that you beat a tremendous amount of butter into. It’s absolutely glorious: not too sweet, fluffy but holds a shape easily, keeps really well with no notable loss in quality over a few days, rewhips like a dream, and tastes so good, it could convert even the biggest frosting skeptic. I ended up using a mash-up of Clarkson’s technique and Stella Park’s recipe on Serious Eats, but using a lot more vanilla bean in it, in the form of vanilla bean paste. (This stuff was wonderful and very concentrated.) I also used vanilla extract. They add different vanilla tones to the frosting and I encourage you to use both for the best flavor.


Assembly and decoration: Wedding cakes are traditionally stacked with hidden dowels that support the upper layers from falling in. This was deconstructed, with each tier on a separate cake stand (I don’t know the name for this style — the Meghan and Harry?). The bride sent me these two pictures from Pinterest to for inspiration, so I kept the cakes plain and let the florist decorate them with fresh flowers. But I’ve been promising you a tutorial for the buttercream flowers (and my one-bag, one-bowl method for them) them since the last wedding cake I made so I’ve added that below. [If you’re looking for tips along the lines of Layer Cakes 101, see this post.]

Ready to get baking?
New Classic Celebration Cake
- 1 cup (8 ounces or 225 grams) unsalted butter
- 2 tablespoons powdered milk
- 1 3/4 cups (350 grams) granulated sugar
- 1 teaspoon fine sea salt
- 1/2 teaspoon baking soda
- 4 teaspoons baking powder
- 2 3/4 cups (360 grams) all-purpose flour
- 2 large eggs
- 2 cups (475 ml) buttermilk, well shaken
- 1 tablespoon (15 ml) vanilla extract
- 1 cup (200 grams) granulated sugar
- 6 tablespoons (3 ounces or 85 grams) salted butter, in 1T slices
- 1/2 cup plus 2 tablespoons (135 grams) heavy cream, cold is fine
- Sea salt flakes, for assembly
- 1 cup plus 2 tablespoons (225 grams) granulated sugar
- 1/3 cup (45 grams) cornstarch
- 1/4 + 1/8 teaspoon fine sea salt
- 3 large eggs, cold is fine
- 1 1/2 cups milk (355 ml), whole or low-fat, cold is fine
- 1 tablespoon vanilla bean paste or the seeds from 1 large vanilla bean
- 1 tablespoon (15 ml) vanilla extract
- 1 1/4 pounds (20 ounces, 2 1/2 cups, or 570 grams) unsalted butter, slightly cooler than room temperature (firm-soft, not mushy)
Brown butter cake
Salted butter caramel filling
Vanilla bean custard frosting
Heat oven: To 325 degrees F. Coat 3 9-inch cake pans with nonstick spray and line the bottoms with a fitted circle of parchment paper.
Don’t have three? Don’t fret. I found no noticeable loss in cake quality when baking the layers one after the other, but you will need to divide you batter evenly.
Brown the butter: Melt butter in a deep skillet or wide saucepan (I’ve been using this white coated one, which makes the color change easier to see) over medium/medium-high heat. Once melted, keep cooking the butter, stirring, until faint golden specks of brown appear at the edges and in the pan, then add the powdered milk. It will get lumpy; do your best to smash the lumps, don’t worry, though, we will get rid of any stubborn ones later. Remove from heat as it begins browning; butter will continue to toast in the hot pan. When it reaches a moderately deep brown/hazelnut color, pour into a bowl and let cool to lukewarm or room temperature.
Make the batter: Place sugar, flour, salt, baking powder, and baking soda in the bowl of a stand mixer and combine with the paddle attachment on low for 30 seconds. Pour in the browned butter (and any sediment in the bowl) and continue to mix on a low-medium speed for 2 minutes. The paddle should beat any remaining brown butter lumps smooth. Scrape the bowl and paddle down, raise the speed to medium, and beat for another minute. With machine running, add buttermilk and mix until combined; scrape down bowl, all the way underneath, where butter-sugar-flour sediment will want to collect, promise. Add the eggs and vanilla and beat until thoroughly combined.
Bake the cakes: Divide batter between three cake pans. Bake cake layers for 17 to 20 minutes, until a toothpick inserted into the center of each cake comes out batter-free. Rotate your cake pans during the baking time; most oven racks aren’t totally level and we want the layers to be. Let cool in pans for 5 minutes, before flipping out onto a cooling rack, removing the parchment paper, and flipping back onto another. Let cool completely.
Do ahead: If you’re not assembling the cake today, wrap them in 1 to 2 layer of plastic wrap and freeze until needed.
Make the salted butter caramel filling:
Have everything ready (chopped butter, cream) and reach-able because this will go quickly. Pour sugar in a large skillet over medium-high heat and cook, without stirring, until sugar is partially liquefied, about 4 minutes. Whisk until all unmelted sugar disappears into the caramel and nudge the heat down to low. We are going to cook it a little darker, but it will go quickly from here. Cook until the sugar is deep amber, 1 to 2 minutes (you can test this on an instant read thermometer, 305 to 310 degrees but, I find it easier to eyeball — it can burn while you wait for the thermometer to finish climbing). Add butter, 1 tablespoon at a time, whisking until each piece melts before adding the next. Slowly drizzle in cream, whisking the whole time — if done slowly, the sugar should not seize up/re-solidify but even if it does, don’t worry, we will cook the caramel further.
Return heat to a medium-high and cook until caramel reaches 245 degrees F, about another 5 to 7 minutes. Remove from heat and pour into a bowl and cool to room temperature. At room temperature, it will thicken to spreadable fudge consistency. You can speed this along in the fridge.
Do ahead: If you’re not filling the cake today, refrigerate until needed, up to 1 week. It will be almost solid from the fridge. Microwave in 10-second bursts, stirring thoroughly between them, just until caramel softens slightly for spreading. No need to get it hot again, or the butter will want to separate.
Make the vanilla bean custard frosting:
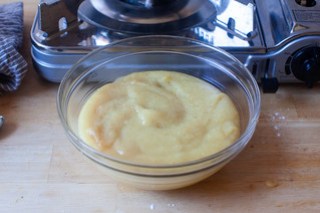
In a medium saucepan, off the heat, combine sugar, cornstarch, and salt with a whisk. Add eggs, one at a time, whisk thoroughly between each addition to make sure no dry ingredients are stuck along the edges. Slowly pour in milk, whisking the whole time, followed by the vanilla bean paste. Bring saucepan to stove and cook over medium heat, whisking the whole time, until mixture begins to bubble. As soon as it does, set a timer for 1 minutes and continue whisking (it will get immediately thick and require some real muscle to do this but I believe in you) the entire time. The custard will take on a yellow color and be very thick. Remove from heat and whisk in vanilla extract. Scrape custard into a small bowl to cool completely, or the bowl of an electric mixer. Press a piece of plastic wrap against the surface to keep a skin from forming. If you’re not finishing the frosting today, refrigerate the custard until needed.
When you’re ready to finish the frosting, scoop custard (cold from fridge is fine) into the bowl of a stand mixer (if it’s not there already) and use the whisk attachment to beat the custard for 2 to 3 minutes at medium-high, until pulverized and a little fluffy. Keeping the machine running, add the softened butter a few tablespoons at a time, whipping it throughly into the custard between each addition. Continue until you’ve used all of the butter and whip for 3 to 4 minutes after that, so the frosting is as fluffy as can be. Finally, run the machine at a lower speed for half a minute, just to make any very large holes smaller.
Do ahead: The custard portion can be refrigerated until needed, up to 4 days. The completely frosting can be refrigerated for 3 days. Take it out a 1 to 2 hours before you need it (bringing it to a cool room temperature) and briefly rewhip it with the whisk attachment before using.
Assemble the cake:
If you cake layers are frozen, you can use them right away — no need to defrost first. If they’re at room temperature but difficult to work with because they’re so soft (this is more an issue with larger cake sizes than 9-inch), you might want to briefly semi-freeze them before getting to work. Cold cakes are easier to trim, frost, and move around.
Assess your three cake layers for how much they match each other in size by stacking them. If the sides are very uneven and will require a lot of trimming to make them stack neatly (we want the sides to be a straight vertical line), do this now. If you have a cake circle, plate, or bowl that’s slightly smaller than the diameter of the cake, using this as a stencil to trim with can make it much neater.
Then, place your first layer on a cake plate. If you have a revolving cake stand, use this too. Use a sharp serrated knife to level the cake — i.e. remove any doming for a perfectly flat top. Brush off any loose crumbs. Coat cake top with a thin layer of the buttercream. Place a big scoop of frosting in a pastry bag, or a sandwich bag with the corner snipped off and pipe a thick ring of frosting around the edges of the cake. Place cake layer in the freezer, just to solidify the frosting. While you’re chilling it, repeat this process on the second cake layer.
If your salted butter caramel filling is at room temperature, you’re good to go. If it’s solid from the fridge, microwave it in 10-second bursts, stirring thoroughly between them, just until caramel softens slightly for spreading. No need to get it hot again, or the butter will want to separate out. You’re looking for a thick fudge-like consistency.
Once the frosting on the first cake layer is chilled solid, spoon (in 1-tablespoon blobs) the salted butter caramel onto the cake top. Use an icing spatula or spoon to nudge it as flat as possible — it’s okay if this never looks even (see my photos for moral support) because it will smooth out as it sits between cake layers. 1/2 cup caramel for each cake layer should provide a perfect height of filling. Sprinkle the surface of the caramel lightly with flaky sea salt.
Place the second cake layer (with a solidified frosting dam) on top and repeat this process. Place the third cake layer (still untrimmed) on top of the second layer of caramel. Press the layers firmly together from the top with your hands. Trim the top flat and even, as you did with the other layers. Your cakes should line up nicely with even sides because you already trimmed their circumference, but if any small amount needs shaving, do it now, being careful not to cut so much that you break the caramel filling dam you piped around the cake.
Cover the top and sides of the cake with a thin layer of frosting — it’s fine if you can see the cake through it. This is called a crumb coat and its goal is to keep the crumbs out of the final frosting. Briefly chill your cake until this frosting is firm to the touch; I use the freezer, as usual.
Cover the top and sides of the cake with a more generous layer of frosting, your final coat. If you’d like to create the sides you see in my photo, congratulations, this is the easiest way on earth to decorate a cake: With your cake on a revolving cake stand, or even a lazy Susan, give the cake a spin and gently press the edge of a small or medium offset spatula or butter knife against the cake and keep it spinning while you draw the knife up the sides.
How to turn this celebration cake into a wedding cake:
As I mentioned in the headnotes, this celebration cake is 3 to 3 1/2 inches tall, which is perfect for a regular party. For a wedding cake tier, you will want it taller, about 4 1/2 inches, before you add any flowers. (See our conversation up top about the size of cake slices.) To turn this 9-inch celebration cake into a 9-inch tier for a wedding cake, multiply every single cake ingredient by 1.5. The layers will be taller, about 1 1/4 inches tall. You will not, however, need to increase the salted caramel filling or the frosting because we’ll have enough leftover frosting that it can cover the extra 1.5″ of height.
So, that’s a 9-inch cake tier. What if you want to make what I did, a 6-inch and 12-inch tier as well? Here we use my cake math. For a 6-inch tier with exactly the same height as the 9-inch tier (4 1/2 inches), you’ll want to halve this scaled up 9-inch recipe. For a 12-inch tier, you’ll want to double the 9-inch. For everything in between and/or over, I’ve described above how I do the math.


How to make a buttercream flower garden
I made my first flower-topped cake in 2018 for that German chocolate wedding cake that was naked cake-style (no frosting on the sides) and needed some prettiness on top. I was inspired by the stunning garden Molly Yeh had piped on top of her rose rose cake earlier that year. Alas, she hadn’t posted a tutorial on how she did it until a couple weeks after the wedding I needed it for (the nerve!), so — for better or worse — I was left to my own devices.
The internet is full of tutorials on how to make absolutely stunning buttercream flowers and more from pastry tips. This isn’t that. This is much sloppier; this is for people who like the look of flowers but also don’t want to work too hard for them. I have a feeling I’ll never convince you that my method is shockingly easy, but I’m telling you, it truly is. Here’s why:
1. Flowers Not Found in Nature: While you might be able to use Ateco Tip #79 to make a Lily of the Valley and Tip #150 to make Carnations, I’m never going to do that. Instead, I watched a few flower-making tutorials (these are wonderful), immediately scrambled them in my brain, and then just used various tips to make bloop and u’s and blobs in cone-d and concentric shapes and found that when surrounded with leaves in leaf colors from leaf-making tips, they’re surprisingly indistinguishable from Flowers Found In Nature, which is great because I’m coincidentally indistinguishable from a person who is going to feel bad if her posies don’t look like posies.
2. The One-Bowl, One-Bag Method: I was about to mix a small bowl of each color I wanted to use and set it up individual bags for each color when I was overwhelmed with a feeling I am extremely familiar with in projects where I’ve bitten off a lot: Must I? Do I haaaaave to? Isn’t there an easier way? And so I tried something else:
– Fit a single, large pastry bag with a coupler. A coupler allows you to switch decorating tips without having to change the bag.
– Put a small amount of frosting in a smallish bowl. The more colors you’ll want to use, the less frosting you’ll need right now. I use a couple tablespoons at a time for this small cake shown here. Arrange the colors you’ll want to use in some sort of chromatic order. Tint this blob of frosting with the first one and put it in the bag.
– Put a tiny schmear of frosting on your flower nail. Place your first square of parchment on top. Pipe a bunch of blops, bops, or swirls into something flower-ish. Carefully pull the paper off the flower nail and put it on your tray.
– Make a few more flowers. Before the frosting in the bag runs out, add another scoop of plain frosting to the bowl and tint it with your next color. Mix it with any frosting left in the bowl from the previous color. Add it to the piping bag.
– Continue to make flowers. Change tips whenever you’re bored of the shape you’ve been using or go back to an earlier one. Add colors as needed. Instead of having distinct colors in each flower, you’ll have blends, ombre-ish. It’s much prettier, in my opinion; a lovely reward for this lazier method.
– When your tray is full, freeze it. If you think you’ll need a second tray of flowers to cover your cake, continue until you have more than you’ll think you’ll need. Very soon, the flowers will be solid and will be very easy to lift from the parchment squares and arranged on the cake.
– Tint some frosting in a leaf-y green. Place a leaf tip on your piping bag. (I’d probably first squeeze out any remaining flower color, since we want the leaves to be clearly leaf-like.) Use the leaf tip to fill in the spaces between the flowers. I have a couple leaf-ish tips and a couple shade of green in the set I have, so I moved between them.
Tools: I have these disposable pastry bags (but would get these compostable ones next time), this AmeriColor gel paste color set (these are particularly floral but there are lots of other color themes to choose from), this set of tips, which is more than I’ll ever need.
More? Shortly, I will put up an Instagram Story of this whole process, which will probably make the frosting and decorating parts simpler. Update: Here it is! I’m thinking about going one further with this — an Instagram Live Q&A one day next week where you can ask me anything you want to know about wedding cakes and I, a not-expert but enthusiastic make-do-er, will do my best to answer them. I’ll keep you posted on a date/time for that.
this is AMAZING. I literally squealed when I saw that you and Erin were having lunch because you’re two of my favorite bakers.
Question – I see that you have TJ’s unsalted butter AND kerrygold – did you use one or the other for cake vs. frosting?
THANKS for the amazing tutorials!
Yes, I talk about it in this (epic, I completely understand if not every word has been absorbed yet or ever) post.
thank you!! I did a search for Kerrygold but then… alas. Your Paris fleur de sel sauce is my all-time favorite and I’ve made a LOT of sauces. It’s foolproof! Can’t wait to make this. Maybe a half recipe for V Day…
Do you think the cake would work as just a 9×13 or as a way to make a single layer?
If you make it as a single layer, you miss out on the caramel filling, which is the star here (the vanilla bean frosting and brown butter cakes are supporting cast members).
Any recommendations for modifying the recipe for cupcakes? Interested in cook time/volume of batter specifically. Thank you! I can’t wait to try this!!
Use an apple corer and punch a whole in the cupcakes, fill w caramel and frost them. Yum! I’ve done that with Deb’s chocolate PB cake too–pb fudge in the middle. Works great!
I have made both my brothers wedding cake, and a year later my own (using one of your previous wedding cake recipes – so many helpful tips!). And found it was more stressful being a bridesmaid and cake maker at the same time than a bride and cake maker. Haha. My tip, Go for a rustic ford ting look and get your florist to arrange the flowers on the cake – mine did an awesome job and it covered up any bits where my frosting wasn’t perfect.
What is that thing you’re using to stir the curd and caramel?
I saw one in my Grandmother’s kitchen and always assumed it was some sort of torture device but now I’m considering stealing it 😉😘
Love these posts by the way, appreciate your many tips & learning about the science behind baking is something I’ve been greatly intrigued by, the more I bake. The difference in caramel temps/types for example, ingredient interactions and floor types-create different textures, etc. You truly have a gift for making it interesting to read about & I love the extra info about the caramel salt level, etc. I can’t wait to try this recipe, among many others! You’re amazing, many thanks for sharing your experience and knowledge (as well as your amazing flavor combinations)!
Sharon McKinney
PS: The ‘whole truth’ about making wedding cakes; oven dimensions, batter sizes/mixers, etc. Appreciate the good, bad and everything else. Brilliant, thoughtful and so true!
you are NOT joking about venues — which have hosted wedding upon wedding upon wedding — not being consistent about cutting their cakes. our venue cut the cake slices so, so small that they ended up only serving the extra sheet cake and at the end of the night we had to figure out how to transport our ENTIRE WEDDING CAKE back to the hotel, store it, and then transport it back home with us the next day. unreal! (though it did make me happy to have cake on hand for weeks after, especially given my 9 month wedding diet, ha!)
I, too, back in 1996 wanted to make my wedding cake but left it to a bakery. The Cornelli lace tasted like motor oil or gasoline. It was awful. How kind of you to have made your friends wedding cake. You give amazing tutorial on how to do this. You remind me of a pastry chef in Houston who would make his beautiful pastel flowers in advance and freeze them. On the day of the big celebration he would go to the freezer and just plop down an amazing arrangement of flowers on the cake and then his pipe in green leaves.
Fantastic tips! And this is for sure a perfect wedding cake.
All my husband’s favourite flavours rolled into one! I see a cake in his future.
Any chance of a photo of the actual cake?
So, the photo with the three cakes (second photo in this post) is it, the cakes right before I delivered them — the florist decorated them at the reception. (They’re not uneven, though, that was just from my phone, and iPhone lenses are a little fish-eyed at the edges.) I do have a phone picture of the cake at the reception, but the restaurant was dark and it’s a pretty lousy photo.
This was fun to read and I’m excited to give this a try. Did you use bleached or unbleached AP flour? Also, do you foresee any issues using low-fat or nonfat powdered milk?
I use bleached; I don’t think it matters here though. I don’t think the fat content of the milk matters.
I was a guest at all 3 weddings and ate all the cakes. This cake was the best cake she ever made. That’s saying a lot because I’ve had her chocolate peanut butter cake too.
🎂🎂🎂🎂🎂
WOW! That IS saying a lot! That chocolate pb cake is our family favorite. You’re so lucky!
Soooooo lucky! Don’t worry that PB cake is still in the top 5 things I’ve ever eaten.
She got to have a slice of the epic sheet cake version I made for my husband’s birthday last summer — she really is lucky. :)
Is this the Jocelyn from wayyyyy back who always commented on your old ‘the smitten’ posts? And the early smitten kitchen ones? I was wondering if you guys are still friends!! Fantastic!
Same one! I don’t get rid of awesome friends. :)
Deb
Was the Caramel filling supposed to run down the cake when cut. Did it do something wrong with its consistency. The cake was delicious but I wish my filling had stayed in place.
It should cut clean but I had hoped it would trickle, say, a few minutes later. Thickly. Slowly.
This is incredible, what an amazing thing to do for your friend. My friends drunkenly made me a red velvet armadillo “bride’s” cake for my wedding, a la Steel Magnolias, and knowing that they went to all of that (again, very drunken) trouble made the reception that much more amazing.
Could I use just two 9 inch instead of three cake pans? I imagine I have to change the baking time.
Yes but the main disadvantage is that you won’t get the two layers of caramel in there, and you really deserve them.
I’m making this for an upcoming baby shower and am glad I decided to make a practice cake last week (stayed up until 11:30 before my first day back from maternity leave to do so… maybe not the best idea). Figured out I needed new baking soda, but even flat the cake layers were yummy. I also maybe overcooked the caramel. I saw several others post about this but no clear answers yet. I also never trust that my thermometer is in the right place or not touching the pan. Is there a better thermometer I should use or a better way to gauge that the caramel isn’t getting too far gone?
This is just the best, most fun post. I read every word.
I feel like you deserve an award, or at least some cake. (This is 6K words, including recipes and various HTML, and yes, it’s where I’ve been all year!)
Totally agree. I was reading over lunch and my husband looks over and says “new recipe?” I told him yes, for a wedding cake, so I’m just reading for fun. He replies, “Reading Deb really is the best.” Such a great post – we clearly both love the blog 😂
Agree! Read the whole post-and while I know I will never attempt to make a wedding cake (or any cake for that matter, I’m baking challenged) I appreciated every word. What a beautiful wedding gift for your friend-and one that will be cherished for years to come…
Wow. Just wow. Unfortunately or maybe fortunately all my best friends are married cuz I’d sure be tempted. The detail is just perfect, the insight so practical and hands-on. Wow again.
Deb, this is amazing! I can’t wait for the next celebration to make this very special cake. Will have to work up the nerve to make all those pretty buttercream flowers though!!
Oh boy… I made two wedding cakes, one for each of my children’s weddings. The first one they wanted to looked like logs and stuff, and turned out okay- ish. We weren’t feeding a HUGE crowd, so didn’t have to make tons. They liked it, which was the point, right? The second one my daughter wanted red velvet and it was a warm day, and the layers don’t work well for me and I hated it. It tasted okay, but, UGH, I think it looked terrible. So, what can I say?? Yours, on the other hand, look AWESOME! I just can’t get the hang of layer cakes. Much to my son’s dismay, lol. You’re an inspiration…thanks
Wow! All that work! Thank you for taking the time to document this all!
Many things I attempt to DIY but luckily for my wedding, there was a bakery in Chinatown that makes the best light wedding cakes. I ordered a 3 tier cake enough for 200 for less than $200. Had too much cake left over (since the serving of cake by restaurant always happened as guests were leaving). My brother took home more sliced takeout boxes of cake than anyone ever should have and ate a box a day for more than a week!
This post has been an absolutely amazing read. I am so excited to make this cake! Thank you for all of the details and thank goodness for cake and filling that can be frozen/fridged until needed. Who needs a wedding, we’ll be having this as “Baptizing Son #2” cake. I cannot want to make this!!!
Thank you! You gave me the courage and tips to make my own wedding cake this past summer and it turned out great! With advance planning and dividing up my tasks over several weeks, it really wasn’t as stressful as I thought it was going to be. Here’s the final shot: https://imgur.com/a/3eDyKo3
It’s made using the chocolate Guinness cake recipe you posted (plus mint oil), with mint ganache and gold painted whoppers and chocolate dogs modeled after my dogs. And it’s decorated with some dahlias I grew. In retrospect, I admit I’m a little crazy. But what bride isn’t? Thank you thank you for your advice and support!
What a beautiful cake. The chocolate dogs are awesome, and the whole cake looks just lovely. Kudos on making your own!
Just want to say THANK YOU for this epic, detailed guide. I made a wedding cake for a (very) low key wedding in 2016 and came straight to your site for advice – especially after they requested “banana” cake – thank god I remembered your monkey cake! And then this last December I ended up making another cake for a slightly fancier but still low key wedding (that I also officiated.. big day!) and used your pink lady cake recipe (a friend group favorite!). Couldn’t have done it without your amazing recipes and layer cake guides. Thank you for saving so many special occasions from terrible cakes! Looking forward to trying this new one!
Wow! This is a great post. I don’t think anyone’s likely to ask me to make a wedding cake in the near future, but if either of my daughters ever decides to get married, I’ll be ready. Or anyone else. Anybody need a wedding cake?
One little typo. The recipe says to cook the caramel sauce to 245, which sounds like the right temperature, but somewhere earlier in the post, you say 145.
I wish I had read your comment before making the scaled down version of the cake for a graduation. My first batch cooked to 245 was rock solid at room temperature and didn’t taste great. I just cooked to a much lighter colour the second time and it was perfect.
I love Erin and am excited that your baking sensibility is blended with hers in this scrumptious cake! I am an avid follower of Erin’s instagram stories and of course her recipes/website. She is so clever and her story narration is hilarious!!, especially when showcasing her foster kitty Pocket. Can’t wait to bake your recipe for a party tomorrow night, celebrating friends who are relieved to have finally sold their house. Guests will be drowning their sorrows because this event means they are moving out of state. I confess that I am a little anxious about making caramel sauce but I think its time to face my fears. I am encouraged because I have never made a Smitten Kitchen fail. You are a fabulous teacher and your finished cake looks so elegant. Thank you!
I have made a couple of wedding cakes (including my own, but they were mascarpone cheesecakes that froze beautifully). It is fun and stressful, but I think that I would do it again.
One suggestion is to make sure that the couple convince the caterer that you are capable of making a cake and that another dessert should not be ordered. After making a cake and having to get it across the Charles River the weekend of one of the biggest regattas in the country when it was snowing out, I almost lost it when I found out there were other desserts. They were late at cutting the cake, so most of it got thrown away. I was livid.
After the wedding, the bride told me that the caterer just did not believe that a non-professional could make a wedding cake. (And I never got a thank you note, so I am still bitter.)
Wow why would they even put you through the trouble? So disrespectful of your time and energy ~.
I hate to be one of THOSE people but being allergic to egg- is there an frosting alternative you would recommend? For The cake I would probably get away with vegan egg substitute but the frosting not so much.
(If not then I would totally skip this Cake , not trying to ask someone for an egg free omelette recipe or anything ;)) you know since you are Deb I feel I can ask and you won’t shout at me. #Smittenkitchenismysafespace
I’m sure Deb has better ideas than I, but wonder if you could make a cooked milk/ermine buttercream? It’s a very similar style to this except thickened with flour instead of egg and cornstarch.
This looks amazing!
Is it necessary to have a thin layer of buttercream on the underside of the 2nd and 3rd layers to prevent the caramel from seeping in? I noticed there’s only buttercream underneath the caramel.
Also, if you adjust the size of this cake (6 inch), how would you adjust the baking time?
Thank you!
Google Sawsen’s egg free swiss buttercream. There are also a lot of recipes using aquafaba, which can now be bought in powdered form on Amazon.
Long-time (14 year??) reader, and thanks to you and your Swiss meringue buttercream I’ve made several wedding cakes for those I love. Glad to see I’m not nuts for preferring to bake my layers separately rather than torte them, too. ;) But I’ve never thought of trimming the sides, so thank you for that trick! Can’t wait to try the German buttercream also.
Hey Deb! I want to make your fudgy chocolate sheet cake for a birthday party with the chocolate cake and fudge filling recipe (I’m partial to chocolate, what can I say). Do you think I could use this vanilla bean custard frosting in place of the vanilla buttercream frosting for frosting the chocolate sheet cake?? Thanks!
Sure, you can use it anywhere you’d use frosting.
I have never related so much to a post! I’m currently preparing for my fourth wedding cake, and my friends also requested vanilla + salted caramel. I was going to experiment with French buttercream and a caramel filling tomorrow (I’m aiming for the exact texture you described), and I’m so glad I now have your trusted recipes to use! I can’t wait to see how it turns out – thank you for publishing your work to make the wedding cake undertaking easier for other bakers like me :)
Very happy to have made friends over this cake!
Next we need to recreate the mushroom burger. Or maybe just go back for another one. I’m down for either.
xx
😊😊😊😊😊
So would you make your own wedding cake now? Asking for a friend.
I’m not Deb, but I’d suggest running a very careful assessment:
1. Are there any other “moving parts” that you will be in charge of before the wedding? Do not attempt more than one last-minute DIY project, basically; if you’re doing the flowers or centerpieces, do not also do the wedding cake. Or if you have people flying in from who-knows-where who you’ll want to spend time with, do not do the wedding cake.
2. Is this your first try at a giant cake? There are… a lot of things… to think of and things that can go wrong, so I would definitely suggest having practice.
3. How tolerant are you of imperfection in your own work? If the fact that a bit of crumb is poking out of the frosting on one side of the cake will drive you nuts, then only bake your own wedding cake when you’ve had enough “perfect enough” cakes under your belt to know how to fix things or roll with them.
4. Do you have an acceptable backup plan if something goes really totally wrong?
5. Can you do a bunch of the prep ahead of time and then stow the cake at your reception site the day before? (because no, you should not be frosting a cake on your wedding day.)
I’d also note that the separate-tiers-on-cake-stands thing (or on sturdy boxes draped with fabric to create a sort of multi-level stand) makes it a lot easier to transport and changes the project substantially (many-tier cakes are tippy. They can collapse. The filling can squeeze out the sides. They can be hard to stack without making a mess.). You’ll still have to reckon with the sheer scope of the project (your fridge will be overtaken by eggs and butter; you will realize how little counterspace you have; you still have to wrangle the cake pan size issues; you make one batch, then another, then another, then another, and suddenly it’s 2am and you’re still not done and that last batch of cake baked needs to cool before you can fill and frost it…), but the mechanical difficulties are reduced. And if you’re doing familiar recipes you could bake with only half a brain, then you’re more set for success than if you don’t bake much cake (or are set on a new recipe/combination/etc.).
(but it’s awfully fun, when it’s fun; the highs are high and the lows are very, very low and the cake is *very* tasty.)
What if I wanted to do these flavours, but cupcakes or mini cakes? Do I just put the cake batter into cupcake tins, then cut and level the cupcakes into 2 or 3 layers? Putting the caramel and buttercream in between each? Mini bundt pan?
Or is there some other reason why it wouldn’t work or taste different?
I wonder if it wouldn’t be easier to make it sheet pan style and use a round cutter to make stackable rounds?
Is there a brand of vanilla bean paste you recommend?
Heilala Pure Vanilla past is to die for.
This was a wonderful post. I thoroughly enjoyed it. My mother had a home cake business for about 25 years and typically made 2 to 3 wedding cakes every Saturday. I’ve made a number myself since then. So I know your tips and advice are perfect.
Can I add 2 more? I may have missed it, but I didn’t see anything about wrapping the sides of the pans when baking. My mother just cut strips of old, worn bath towels, moistened them, and pinned several layers around the pans. It helps a lot to keep the baked cake from having a high dome that has to be cut off. I have found that the cake strips sold by Wilton and others work even better.
If you need to have a lot of cake, rather than make a cake more than 3 tiers or bigger than 14 inches at the bottom, it can work better to make and decorate a 9 or 10 inch round cake and put it on a beautiful pedestal cake stand. This is much more attractive than a layer cake. You can set 2 or 4 (decorated in the same style as the big cake) around the main cake and it looks all of a piece instead of like an afterthought. Bonus: they can be different flavors.
Thanks Deb! I can only imagine not only trying to make an entire wedding cake but also having to DOCUMENT the process. You’re a gem and I never get tired of your humor and candor.
Would love to make this for the next birthday in our family! I have done frozen little rosettes on a 6 year olds cake, filling in with leaves. I loved it. In your notes you say the cake layers are a generous 3/4 inches thick, I’m guessing that’s not .75” but 3-4”? 😁
Yes, .75″
Do you think the icing (and cake in general) is achievable without a stand mixer (hand mixer only)? If not, do you have any substitution recommendations? Thanks!
So much fun reading this! My good friend made her son’s wedding cake, and the hardest part was driving it from Albany to Ithaca in midsummer.
The yummiest wedding cake I’ve had was actually a caterer’s cake in Wisconsin.
A Carrot Wedding cake with cream cheese frosting ( Yes, you, Jason and Gina).
It surprised everyone.
Recently been to 2 weddings with no cake, but small sweets instead, and a wedding with pies , all made by the bride’s friends.
Moms and girlfriends are the best people!
This is straight up my alley, literally the flavors (slow browned butter, proper salted caramel) and techniques (german buttercream, reverse cream batter) I’d choose for myself. Often these formal celebration cakes in the Anglo world o’ pastry, with their sturdy batters, gelatin fillings, and unflappable frostings, are underflavored and disappointing texture-wise, a canvas for the decorators. So I appreciate the Perelman take, which always (ALWAYS) serves the palate as much as the eyes.
Thank you, Deb.
What a wonderful gift – both the wedding cake and how much work you’ve done to share the “how to” with others. It is very generous. You are amazing. Thank you.
Such a great post! I think you might enjoy this person: http://gillianbellcake.com.au
She has a wonderful podcast called ‘Dispatch to a friend’ where she and a friend read aloud their letters to each other. Thanks again for a very entertaining and i formative read.
Thank you, thank you, thank you! I agreed to make my sisters wedding cake this summer and after 2 test cakes I was feeling daunted about turning a regular cake into a wedding cake. These tips will make the things I struggled with so much easier.
Question. I understand trimming the dome off the top of the cake. But what is the point of trimming the sides? Aren’t the cakes already the same size?
Not exactly. They should be but if you want neat sides, you need to trim. They’re not going to come out of the pans with straight vertical sides.
Everything about this post gives me joy. Where do you buy your food coloring since NY Cake is closed?
It moved a block away, has been reopened for a while. But, I bought the set of colors I used online: https://amzn.to/372kuig There are other color sets if you’re not looking for such floral colors
My sister and I made my wedding cake from your sticky toffee cake and it was delicious and absolutely beautiful. Thanks to my very talented sister and family. I would attach a picture but can’t get it to paste ….
Wow, just wow. You’re cakes are wonderful. I’m wondering if you have posted some info on just how to dowel cake layers. I’m anxious to make a tiered cake and have never used dowels. I’m sure there’s more to it than just jamming the dowel down through the layers. Any help? Suggestions?
It looks divine and I might even try it. How much frosting do you hold back to make the flowers?
It’s all in the recipe headnotes. The batch makes about 6 cups. You’ll need 4 to 4.5 to fill (under the caramel), dam, and ice. You’ll have more, way more, than you’ll need for flowers.
I can’t wait to make this. I am thinking about cupcakes – what about filling the cupcakes w the caramel, since there wouldn’t be the layers?
I’m also envisioning the cake part with maybe a strawberry buttercream? I don’t know, but I love anything brown butter so I might have to experiment.
Shari, I just did this today. It worked really well. My caramel seemed extra thick so it was perfect for filling. Maybe I overcooked it. My thermopen said 245 degrees, but I always feel like I am taking the temperature in the wrong place. The cupcakes were delicious. I sprinkled the top with a bit of sea salt and added a caramel drizzle.
What an amazing gift! My favourite gift from our wedding was our beautiful and delicious wedding cake made by my talented cousin.
Awesome and incredibly comprehensive, thanks so much! German buttercream is definitely going on my to-try list. Could you link the white-coated saucepan you referenced?
Wow! Thank you for this amazing post. Enthusiastic cake baker here. Will take a few reads to absorb content of this post! Thank you for the links; very helpful. Would love for you to post a photo of the final cake as presented with fresh flowers. I am excited to follow your tutorial on making flowers; but still curious to see the final result of your incredible effort.
Brilliant! I figure “weekend” is reason enough to celebrate and want to make this. Just a question, can I substitute for or omit powdered milk in the caramel? It’s hard to find it in Switzerland (read: EVERYTHING is hard to find in Switzerland), so advice would be very much appreciated :)
Would think you could use protein powder instead of powdered milk but I haven’t tried that personally …
Deb-
I’ve also made three wedding cakes (all for family), and each was definitely an adventure. Our garbage disposal broke during the first one. We also had to transport that cake 400 miles, so we boxed each layer and my spouse cut squares out of some
styrofoam-like product to hold the boxes in place in the back of our Jeep Cherokee. We turned the AC on full blast, layered on sweaters so we wouldn’t freeze, and drove.
Arriving at the groom’s mother’s house around midnight, we discovered that the fridge space we’d been promised was not available as she’d decided to make an elaborate brunch. So we went to the supermarket to get ice and coolers, but the larger layers wouldn’t fit in the coolers. Luckily 1am was restocking time at the store, so we grabbed empty heavy cardboard boxes for the larger cakes, foam coolers for the smaller ones, large black trash bags and ice, and built a temporary cooler in our hotel room to keep the cakes cool until we could assemble and store them at the venue the following day. And despite all of this, I undertook two more wedding cakes! It is a sickness, I think.
All for the love of cake! I bet it was divinely delicious!
German Buttercream is new to me. Thanks!
Dang…you’re good! I’m impressed with the cake, but most of all the decorative icing! Nice! Very professional-looking. That would very difficult for me..it’s a very balanced design and makes the whole thing sing!
A true labor of love!
Both the making and the encyclopedic tutorial.
Bless your heart!
I just made this as a test for my very own “project wedding cake” for my wedding this May, and it was phenomenal! I decided to add a thin layer of chocolate ganache beneath each layer of salted caramel. My only regret was that I “tasted” too much of the salted caramel, and I wish there had been just a bit more between the layers. The ratios seem perfect as written, so increase the caramel if you know you’ll eat more than a simple taste :)
I was so excited when I saw you were making another wedding cake! It’s been NINE years now since I started reading your blog as a freshman in college. The first cake I baked from scratch was your Double Chocolate Layer cake with raspberry filling. Since then I’ve made the hazelnut brown butter cake, pistachio petit-four cake, almond raspberry cake, and countless variations of that chocolate cake and of the vanilla cake from your original project wedding cake (including with mango curd and the swiss buttercream). I was planning to make the vanilla cake with lemon curd for my wedding cake, but part of me was craving something new, so I was so excited when I saw you were working on another wedding cake! This is my favorite one so far.
Thank you for being a part of my learning to cook and bake! I can’t overstate how important this blog has been to me for the past decade.
I am seriously considering baking my own birthday cake this year instead of buying one…inspirational!
Hi Deb, Love your site, lately nearly everything coming out of my kitchen is “smitten” as the family says… This cake looks amazing and I was inspired to make it for my daughter’s upcoming (24th) birthday party. Do you think it could be made up with the caramel layers in the cake and a crumb coat on the cake and frozen at that point? Then brought to room temp and finished icing? Would save me some time and stress on the day of the party.. I wasn’t sure about how the caramel layer would work if it was frozen..Thanks.
Yes, absolutely. But give it a looooot of time to defrost and get to room temperature.
Fantastic cake tutorial, Deb! Your method is pretty much how I gauged cake size and quantity for my clients.
Such a fantastic recipe! I made this for my Dad’s birthday and it got rave reviews! Thanks for another fantastic recipe Deb!
I would just like to note that the last time I made a wedding cake, the reception location was going to serve it. It needed to be gluten free. The reception location absolutely insisted, up and down, after repeated queries, that the slices MUST BE 2″ by 2″ – and since we had two cake flavors, I made enough for a 2″ by 2″ slice of each for approximately everyone there.
Reader, they were assuming that “gluten free” must of course mean a flourless, single layer cake.
When faced with the 3-layer proper wedding cake, they instead reversed course and cut 1″ by 2″ slices, serving flavors alternately at place settings such that each person got one (slightly randomized) flavor of cake (and since they’d taken the cakes into the back for slicing, there was no apparent method for people to get seconds or try the other flavor of cake via a new slice rather than swiping a bite of their neighbors’ slice).
We had literally *4 times* as much cake as was necessary.
Sure, it’s better than running out, but… ooof.
Oh! Also! Churches and community centers often have large ovens, and sometimes they will let you use them. I would note that every oven is different, and convection ovens are Especially Different, so bake a 6″ test layer or two before doing the “real ones.”
Also, it is sometimes neccessary to get creative about mixing bowls, if you need to use an electric mixer or if you need to combine multiple full-stand-mixer batches of frosting (to make sure the base layer of the wedding cake comes out all the same color – butter and egg will sometimes cause the same recipe to come out slightly different tints). I have used punch bowls, saucepans, and *an 18″ cake pan* (from a larger wedding cake) before when things were tight. Make sure the item is food safe and won’t be damaged by your mixing method, but otherwise: think outside the box, and go for it. :-)
Deb, there is so much here to thank you for in this wonderfully detailed post (yes, I most definitely read every word), but what I’m particularly excited about at the moment is the introduction to the reverse-creaming method. I live at 7,500 ft, and my cakes always fall a bit in the middle (not a problem with the same recipes before I moved to the mountains); I was thrilled to learn that this is a potential solution! Thank you–as always–for the many bits of cooking inspiration and wisdom, and your delightful writing. It’s a pleasure to learn from you. Cheers to your beautiful wedding gift to a lucky friend.
Re: scaling recipes for different pan sizes
To avoid the problem of fractions of eggs when scaling recipes for smaller or larger pan sizes, it can help if you know egg volume for different egg sizes. For example, the volume of large eggs is 3.25 tablespoons; extra large eggs are 4 tablespoons. I was recently scaling a recipe which called for large eggs to a smaller pan size, and scaling the eggs resulted in two whole large eggs plus a fraction of one large egg. But if I used extra large eggs, two whole eggs! Just Google “egg volume by size” and you’ll find the chart which gives you the volume (in tablespoons) for every size egg. Trust me – this information makes scaling recipes much easier! (Oh, and if you’re using a cake recipe scaling calculator, such as the online Cake-o-meter, input the eggs by tablespoon volume, not by number of eggs).
Replying to my own comment with additional information!
Here’s the link to the Cake-o-meter:
http://www.cakebaker.co.uk/baking-tin-size-conversion-calculator.html
I’ve been using it for over 10 years and its calculations have always been spot on.
Two points: the default pan size fields are in centimeters. Make sure you click on the drop down menu for both “Existing baking tin” AND “New baking tin” to switch from centimeters to inches!
Also, input measurements as decimals, not fractions; 1.5 cups flour, not 1 1/2 cups flour.
The Cake-o-meter allows you to input either volume or weight measurements; metric or imperial. You can mix the type of measurements you use for different ingredients in the same recipe.
You can also adjust to ensure the cake height remains the same when scaling by adjusting the *pan height* in the “New baking tin” field.
Hope the Cake-o-meter helps others who may be as math-adverse as I am!
Hi Deb! This looks amazing and I want to try it for a baby shower cake I’ve been asked to make. How long did it take your largest tier to come to room temperature? This is one of my biggest challenges making a larger cake – it’s always served too cold because even after 3-4 hours out of the fridge, it’s not at room temp but I have to keep it cold to stack at the venue…
I didn’t time it but I’d give it 8 to 10 hours to be safe
No better excuse to make a fabulous wedding cake for an anniversary! Added bonus you children can marvel and enjoy.
I have made cakes for two weddings, and swear after each experience that I will never, ever do that again… and yet, here I am reading this post and thinking how great this cake would be for an upcoming 20th anniversary party.
I need someone to talk me out of this plan….
I swear Deb, I have been dreaming about your next wedding cake post since your last two and I think I helped will it into existence with all my wishing!!! Funny enough one of the tiers of my wedding cake this past June was brown butter pound cake with vanilla bean mousseline and vanilla bean butter cream with salted caramel -and I’ve always made your Parisian salted caramel and it’s something (I‘ve already told you) that I gave to my now husband the first day I met him- but anyway I add a twist of smoked sea salt to the caramel and had our pastry chef incorporate that flavor twist into that tier so other than that it’s almost identical! Oooh but we also added a Brown butter streusel crumb sprinkling in between the layers for an extra brown buttery texture contrast because what else could a bride who had been carefully watching her diet in preparation for her wedding truly crave more than alllll of those scrumptious ingredients!!! You have put me in the dangerous territory of attempting to make wedding cakes for my dearest friends now!!!!!
What are your thoughts on adding a streusel crumbling for texture? Is it too non traditional or do you think it’s a welcome surprise?
Ps you are a baking goddess and I bow to you!
It didn’t make it dry, did it? I’ve never tried one in the filling before but that would be my first concern — for a non-fruit filling like this. And thank you; this is clearly all your fault. :)
Ummmm, this is the first time I have questioned your sanity….lovingly of course.
You are always an inspiration
Fantastic!
Question: How long can you freeze a decorated cake before using?
I don’t freeze decorated cakes. Unless you’re just thinking of freezing a top tier for the wedding’s anniversary?
Thank you so much for sharing with us.
This look so fresh and delecious
I loved this post so much. Particularly bc I am a strong believer in NOT making wedding cakes for friends’ weddings. BUT I have a friend who felt differently; and because I love her dearly, I was roped into making one. So I forwarded your post to her because I became a tyrant about how we could have no fun until the cake was done or there would be tears on the wedding day bc she had committed us into the endeavor. Thanks for sharing your journey in this “make a wedding cake” adventure!
I made just the buttercream, I halved the recipe by using half the ratio of everything and 2 instead of 3 eggs. And 2 sticks of butter. It was excellent. Despite the fact that I cooked the custard too quickly and I think it had a stronger egg flavor because of the added egg, it was fantastic. This will 100% be my go to icing recipe. Thank you!
Hi Deb! Number 1 is thank you so much for all the fabulous recipes. My sister and I and our small urban kitchens have been making and baking from your site for over a decade, and we appreciate you. (I’ve used your original wedding cake post to make many a smaller-scale celebration cake over the years.) Super rando q. but do you think this cake base would work for a Barbie doll cake? I have a 7-cup Fat Daddio bowl pan and a kid who wants a doll stuck in it. Do you think it would bake up sturdy enough? And how might I inject some of that caramel into it? Any thoughts? Thanks so much and stay gold.
Not sure — usually the molded pans need a very tight crumb. This is more on the moist, fluffy side.
I want to make the full recipe at a future point, but was thinking about converting to a filled cupcake recipe for an upcoming kid birthday party (yes, I do make questionable choices where my kid is concerned.) Is the caramel thick enough that I can use it (cooled) to fill a hole in the cupcakes, or is it just going to act like a soaking syrup? Thank you!
It’s not going to soak in, but you can always line the hole with a thin layer of frosting, as we do on the cake.
Could you use malted milk powder instead of regular milk powder?
They’re very different products, I wouldn’t do it.
If you don’t have time for the beautiful, delicious fancy icing, I highly recommend making a brown butter frosting.
Good morning from a very windy UK! Have just made a small practice version (absolutely fantastic!) for a friend’s wedding later this week, but have a question about increasing the quantities of ingredients: you’ve said to scale up to a 12″ wedding tier to double the quantities for 9″ recipe – is that the regular 9″ or scaled up 9″? Many thanks!
Made the buttercream only. Took a long, long time to incorporate the butter into the chilled custard (our house is about 63 in winter, so might have just been too cool.) But after 10-15 minutes on top speed, it magically coalesced into the most luscious and perfect frosting. Patience is rewarded here — I normally scrape off icing but this time really enjoyed each bite!
I split this in half but used 2 eggs in the custard, and I think it made the frosting just a bit too sturdy to spread nicely. I’m no icing expert, but swiss merengue buttercream goes on like silk. So definitely beat and split that 2nd egg if you halve. Also, it seemed a smidge short in caramel – and I didn’t eat any – so if you halve this, make all the caramel. Promise you it won’t go to waste.
I made this cake for a birthday party, and it was divine! The cake itself was moist and delicious – a new favorite. Next time, I will cook the salted caramel less so it is more runny than fudgey. While delicious, we found it to be too thick.
An important note about German buttercream – the temperature of the ingredients is very important. I thought I had my butter at the right temp (a bit cooler than room temp, as Deb suggested), but the buttercream was not coming together. I found a Serious Eats article that saved the day. My buttercream was 63F when it was supposed to be 72F (perhaps because my custard was cold from the fridge?). A quick dip in a hot water bath was all it needed. It whipped up perfectly after that. I definitely have a new favorite icing! Thanks, Deb!
https://www.seriouseats.com/2018/05/german-buttercream-is-vanilla-pudding-whipped-with-butter-whats-not-to-like.html
I made this cake as written and it is DELICIOUS. The brown butter and vanilla flavor comes through in the soft cake, the whole package is delightful.
It’s the first time I’ve made proper caramel and it still betrayed me (though it’s not the recipe’s fault!). These cakes are Delicate, much more so than SK’s birthday cake or other yellow cakes. Be very careful with them as you flip them out of the pans.
Really try to use a white-bottomed pan to do the brown butter and the caramel in, it makes a world of difference vs a steel pan. The brown butter should really be a whole layer of brown sediment when it’s ready.
When making the buttercream, if you’re adding butter to the custard cold from the fridge, it will look like it has curdled for a minute. Don’t panic and keep whipping and adding softened butter.
I fell victim to what Deb said not to do: when trying to get the caramel spreadable, I heated it too much (three 10 second bursts was too much in my microwave) and the butter separated. My glorious caramel was a worthless golden blob swimming in oily butter. I put it back in a pan on very low heat and stirred for all I was worth for about 5 minutes: it came back together! I spread it on my cold, buttercream-ed layers.
The biggest caveat: think about when you’ll be serving the cake and make sure you haven’t frozen the crumb coat enthusiastically and run an errand for an hour. Even after 3 hours at room temperature, when I served the cake the caramel was very chewy, making it hard to cut and eat. The next morning, when I had the last slice for breakfast, the caramel filling was lovely and soft. Lesson learned!
This cake was amazing and the instructions were so helpful. I managed to have a user error issue – my caramel, when cooled, hardened way too much. I’m not familiar with making caramel but I’m guessing I overcooked it. If anybody can confirm my suspicions, I would appreciate it!
I am no caramel expert, however, I had the same issue with my caramel. I made 3 batches before getting one with correct “fudgy” texture. First batch to 245oF, hard as a rock on cooling; second batch to 235oF, still too hard (toffee consistency); third batch, using a different thermometer, stopped at 230oF and it came out what I perceive to be the desired texture.
This exact thing happened to me, too. Except I stopped after the 2nd batch. Yummy caramel, but definitely too hard, like chewy candy. Not sauce. :(
It is not supposed to be a sauce consistency. It gets thick and very firm. You warm it in the microwave as I directed just to loosen it; it might separate but it won’t affect the final filling. This creates a caramel layer that won’t run out, but will stay pleasantly soft inside the cake. Promise!
I tried to microwave the second batch – 10 seconds – and it split (caramel / butter). Then I tried to slowly reheat on stove to re-combine, and that failed. I did not get to “sauce consistency” on 3rd batch, I got to “fudgy” consistency (add tablespoon, flattens very slowly to disk shape) that did not “run” out of the cake. I live in Canada and it’s still winter here, so the cake was not exposed to very warm indoor temperature (no more than 19oC).
I just made this and carefully heated the caramel to 245. It became very solid in the final version, so much so that the caramel layers pulled out from the remainder of the cake when we cut the slices and stuck in our teeth 😬. I’d try 230 next time… but we liked the flavours!
I had the same experience when heating the caramel to 240, it was a harder caramel and made the cake almost impossible to cut. Definitely going to experiment with different temperatures to get a fudgey texture.
Hi Deb! I wanted to comment for the first time ever, to thank you for inspiring me to make my own wedding cake(s) back in 2014 (your double chocolate layer cake and strawberry tart). Baking them with the help of my three best friends is one of my most treasured memories of my wedding. Since then I’ve made two additional wedding cakes for friends, and I would not have had the confidence to do so without everything I’ve learned from baking along with you over the years–and from your first wedding cake post. Thank you!
I made this as a little six-inch layer cake for my stepmother’s birthday (just halving the recipe as given for a 9-inch cake) and it was extremely cute and delicious. Somehow just about everything that could go wrong, did–I scorched the brown butter, the caramel gave me all kinds of problems, the custard was all lumpy–but I perservered and everything worked in the end. I think I had trouble accurately measuring the temperature of the caramel, but also after I took it off the heat it separated–there was caramel, but it was kind of in bits in a sea of butter. So, after it cooled, I reheated it and boiled it up again–but I think I went too far, because then when it cooled it wound up rock-hard. So I did it a third time and added a lot more cream, and finally it cooled to a spreadable consistency. I also clearly did the custard wrong–I am sure it wasn’t meant to be so lumpy–but I used an immersion blender to smooth it out after it had cooled and then went ahead. The frosting was perfect and easy to use and beautiful once I got it right. And the caramel was delicious. Everyone liked it, including my very picky kids. (Yes, they are even picky about cake.)
Has anyone tried a GF version of this?
Hey guys – in case anyone else has a question about whether or not this cake can be GF, I wanted to answer my own above question. ;)
Short answer – yes, a GF cake works. So go ahead and give it a spin.
Longer answer – I made the cake twice with two different GF flours. King Arthur Measure for Measure and Bob’s Red Mill AP GF Flour. I thought the KA GF flour was a better cake.
One other comment regarding salted caramel. I made it twice; first time cooking to 245 degrees and it cooled waaaay too thick. Second time I made it I only cooked it to 238 degrees and it was perfect consistency.
Thanks Deb for a fantastic cake recipe. I certainly hope my mom loves it (it’s her Mother’s Day present.)
I have made this twice now, once as a 6” and now as an 8” (using the regular height 9” ingredient proportions). First I should say both cakes turned out super delicious, but I have a couple of specific questions. 1) Cake: I had to bake quite a bit longer to get the center cooked through. I let cakes cool 10 minutes before trying to turn them out of the pans, and both times they were extremely soft and had a LOT of buttery residue. They were nearly falling apart. Is that to be expected or do you have an idea what I could do differently? Froze the layers, which made final assembly no problem.
2) Caramel filling: mine took a while to come up to 245F, and after cooling was was a much thicker consistency than I would have liked. Solid enough to make the assembled cake difficult to cut through. Should I have used a higher stovetop heat to get it to 245F faster with less evaporation? Or cook to, say, 235F instead?
I baked a 9 inch cake and had similar issues with the cake taking longer to bake and being too soft. My first layer crumbled when I flipped it out of the pan, my second ripped a chunk out of the center top when I flipped it right side up, and my third survived flipping onto parchment paper and then gently peeling the parchment paper off when it flipped right side up. All three look kind of deflated. I patched the first two layers up and froze them and will hope for the best during assembly. I wonder if I did something wrong during the mixing – the batter was much fluffier than I’m used to, almost a mousse-like consistency.
Same exact thing happened to me baking an 8 inch cake. All three layers fell apart.
I made this in the fall and it was great, but just had this soft batter issue. Took a really long time to bake, and layers were crumbly after a few minutes of cool down. Any thoughts where I went wrong?
Was making for some friends but may have to shift to your best birthday cake and do easier-to-frost cupcakes.
If anyone should ever want to know the volume of brown butter rice crispie treats needed to fill various sizes of springform pans, I’m your girl. I made 300 servings worth in 4 double height layers, using 17 boxes of cereal. Also, leftover crispie treats freeze amazingly well for months at a time and there never was a more easily transported “cake.”
Wow! I honestly never know they froze. Great job!
Loved this blog. I need a reason to make this cake so my granddaughter’s 13th birthday is it. Love your recipes. When I’m looking for a new recipe to try your cookbooks and recipes are the first ones I consult.
I made some of the components (caramel filling and frosting) for my husband’s birthday, with the Fudgy chocolate cake from the party cake builder in Smitten Kitchen Every Day. I had promised to make him a chocolate cake, there was no way of getting around it. I can’t comment on the cake part (but I’m dying to try it, I’ll definitely make it soon!), but the filling and frosting were amazing. They were, as I suspected, so good with the chocolate cake, it was just amazing. My cake received rave reviews from everyone that tasted it. I can’t recommend this enough, and I’m sure it’s even more amazing with the brown butter cake. However, if you were curious to try with chocolate cake, I can confirm it’s delicious!
Thank you so much for writing all of this, it’s amazingly helpful and detailed but, as always, so easy and enjoyable to read. I’m embarking on my own project wedding cake, and your volune scaling system is by far the most sensible I’ve found. I’m having a hard time finding info on scaling up the baking *time* though. Can you share how long it took to bake the 6 vs. 9 vs. 12 inch layers?
I didn’t write it down but it’s usually (obviously) less for the 6″ and more for the 12″ but not a LOT. It’s not going to be, like, half the time for a 6″ or double for a 12″.
Gotcha, thank you!
This is my first layer cake, and I’m a bit confused about the timing. Say I want to serve the cake Saturday afternoon, and I plan to have the layers frozen in order to frost it. Do I need to assemble it Saturday morning and leave it at room temperature the rest of the day (whipping the frosting that morning)? If I assemble the whole thing on Friday, do I store it in the refrigerator (and how far in advance do I need to take it out of the fridge before serving?) Basically, how do I have the freshest fluffiest frosting but an unfrozen cake come time to eat it?
Please, even if you aren’t Deb feel free to advise!
Any of those should work. Cake does not take long to defrost at room temperature. The most important thing is that you have the finished cake at room temperature for a few hours before serving it.
This cake looks DIVINE! I can’t wait to make it. I am thinking of making it for a friend’s birthday. The only issue is that she doesn’t like vanilla. I know, she’s kind of a monster. Kidding, I love her. So, SK republic – any thoughts on alternative icings that would go with the flavour profile of the cake and filling? Thank you in advance!
I need help please! I’m so excited for this cake, and I’m trying to make this for a baby shower this weekend. I made the custard and put it in the fridge to assemble the icing tomorrow. I went to have a taste, as one does, and the custard is HARD- the consistency of caramel, not at all what I was picturing it should be like. Do I need to scrap it?
No, it whips up fine. I mean, it should be hard hard but much much firmer than your usual dessert custard.
I am a long time reader of the Smitten Kitchen blog, met Deb at a cold and snowy book signing event in Montréal and enjoy making her recipes. First time posting a comment on a recipe. The reverse-creaming method caught my attention on this post. I had never hear of this technique and decided I wanted to try, so, I got my ingredients all ready, read and re-read the instructions, and kept all of Sunday open to bake this cake. The caramel was my most difficult stumbling block (as Ruth and Peppery mention above). I had to make 3 batches to arrive at the “fudgy” consistency. Not sure if my candy thermometers are off (I used 2 different ones) or if the position in pan affected readings, but I needed to halt the last step of cooking caramel sooner than indicated in instructions. The cakes are delicate to manipulate un-frozen – I would freeze them next time around. I have plenty of icing left over (made 2D flowers, not 3D ones on my cake). The end result is not as elegant as Deb’s version, but the taste was appreciated by my family. Because I did this test run, I feel I can bring this cake to the next “celebration” event for family and friends.
Hey Deb! This looks amazing! Two questions… can I use goat milk powder instead? Your suggestion disappeared because of coronavirus, I think, and the other options online are quite large, so I could only find a small goat milk powder at the local Whole Foods near me. Also, I don’t have a paddle attachment or a stand mixer, either… can a hand mixer be used instead? Thank you!
Regarding using a hand mixer: the volume of cake batter for 3 x 9″ pans and the final volume for the buttercream was high enough that it went above the flat part of my paddle attachment and top of the whisk attachment. My hand mixer attachments are not tall enough for the job of the full recipe. Some have halved the recipe successfully (I have only it made the full recipe once), and I believe the hand mixer would do the job in that case.
You can definitely use a handmixer but for the frosting, it will take a bit longer and you’ll really need to make sure it’s broken the custard chunks down fully. I’ve never used goat milk powder so I’m not sure how close it is.
Made it with a handmixer! No paddle attachment! I did get a blister after the frosting because it took so long… but it worked! Ended up finding regular powder milk elsewhere, so that part worked fine. The only challenge I had was the caramel because it hardened a bit too much, which made it hard to cut through the cake and eat – based on other comments, I’m guessing I overcooked the caramel. (Although it was still delicious!) Cake layers were definitely much easier to handle after freezing. Anyways, thank you for the recipe, Deb; it was a fun challenge to make and people loved it!
How important is the powdered milk? Or any substutions?
Skip it. I explain in the post that it makes the the brown butter more deeply flavored, but it will still work without it.
Thank you!!
This is a gorgeous cake! Planning on making a scaled-down version for a birthday tomorrow, and I wonder if full-fat plain yogurt (Brown Cow brand — not greek or strained) would do the trick as a substitute for buttermilk, and if so, if the usual 1/1 ratio would work (stay-at-home order means we aren’t going out for nonessential things). Thank you!
I made this yesterday for my quarantine birthday cake. There were a couple of points in the recipe that didn’t go as described for me, so just want to point those out for others who may be considering it:
At 325, my layers took about 35 minutes to cook, about double the time suggested in the recipe.
My caramel never reached 245, and I eventually just stopped cooking it at 215 because it was getting too thick. Ended up more like toffee than caramel, and I ended up scrapping it. If I did again, would go by texture rather than temp. I have not had problems with my thermometer in the past, but ¯\_(ツ)_/¯
The custard turned out lumpy, which didn’t really matter given how it was whipped with the butter to make the frosting, but I was worried for a moment there, so I just wanted to point that out–if it’s a bit lumpy it will work out in the end.
In the end, the cake was delicious, very beautiful, and I’m happy I made it!
Any suggestions for what to use in place of powdered milk if we cannot get a hold of any right now due to grocery shortages?
I did not use it because I did not have it on hand. Deb mentions to another poster (Alex on March 17) that is can be skipped. The extra powder adds depth to the flavour.
Skip it. It’s only to add extra depth to the browned butter; recipe works fully without it too.
Thanks for the wonderful recipe, Deb! The brown butter cake was absolutely amazing. Light and moist. I messed up my first round of caramel – cooked the sugar just a minute too long, so it had a slightly burnt, bitter aftertaste and became nearly solid. The second round was much better and had a perfect texture. Whisk the sugar the whole time, not after 4 minutes in the pan!
The buttercream was a trial with my hand mixer. I think my ingredients were too cold at first, so nothing was coming together and everything was just big chunks. I warmed the mix and the butter to about 70 degrees with a warm water bath, and that did the trick. I found the buttercream to lose its wonderful vanilla flavor with every extra stick of butter. Doing this again, I would use 3/4 – 1 lb butter, testing along the way for texture and flavor. I think this had at least a stick of butter too much. And if you’re not making the flower garden, you’ll be left with WAY too much buttercream leftover (great for snacking, but still too much).
How long does this cake keep for? At room temp or in the fridge? Thanks!
5 to 7 days in the fridge.
The assembled cake, I mean – I see the instructions for preserving each individual component. :)
This was so fun! Fun because there was absolutely zero stress involved – made this for a quarantine-time birthday. And I don’t think it’s just the low stakes talking when I say this was surprisingly easy, thanks to the well-written recipe and doing each step in advance. I did have a couple slight hiccups: misunderstood that the powdered milk needed to be added prior to the milk solids browning, so added it at the last second and therefore missed the added boost of flavor, as it didn’t have time to brown before I needed to remove from heat (could it just be added with cold butter at beginning to help others (me) avoid this mistake (again)?); then there was the caramel, which I think I got ever so slightly too dark in the sugar-ambering stage, and which also separated when I microwaved it (note: I was very carefully microwaving at first, but it seemed solid as a rock so I let it go a little longer and that was my fatal flaw – check/stir your caramel every 10 seconds no matter how rock-hard it looks!). I just poured off a little of the excess separated butter before spooning and smoothing over the layers. It turned out FINE though- delicious (if a smidge bitter), fudgey and chewy, not hard but not saucy. Last, my from-the-fridge custard was not whipping nicely with my first few tbsp of butter, so I let it come to room temp in the bowl for about 10 mins and it started whipping up beautifully. Note: I cut the entire recipe in half and made a cute 3-tier 6.5″ cake and had plenty of caramel and frosting.
What can I do if I don’t have powdered milk?
Skip it. It adds an extra depth to the brown butter, but it’s not mandatory.
My frosting is just liquid what did I do wrong???
There are a lot of steps here so walk me through what happened. You made the custard base — was it stiff? When did things become liquid?
For those who are wondering, I made half the cake recipe and got about 12 cupcakes out of it. Probably could have gotten up to 14 if I tried.
I did NOT do well on the baking, though — i make cupcakes almost never and am NOT good at it. I have a small upper oven that I did on 320deg and at 15 minutes they were beautifully puffed, but not as close to done as I thought. Probably should have been untouched for about 20, then tested after that. They fell, and despite several additional 3min baking checks, I’m not sure they are fully cooked inside. but they smell amazing!
All other vanilla cakes are now dead to me. I made this one, substituting diced, slightly macerated and drained strawberries for the caramel filling, and it was a Mother’s Day triumph. The German buttercream is definitely more time-consuming than my beloved Swiss buttercream, but I do think it has a depth of flavor that’s unrivaled, and I liked the texture, too.
The real star of the show in my book, though, was the cake. Even without the extra milk powder, the flavor was so good I’d gladly eat it plain, and the texture is exactly what I’ve been looking for in a “white” cake. Thank you for sharing your genius with the world, Deb!
Deb – I’ve been an off and on follower since I got married 12 years ago. Over the weekend we baptized our 7th baby. I didn’t really bake much except paleo crap for about 7 years, but we’ve been baking up a storm during quarantine. My baby is just 2 weeks old. I should have been sleeping, but making this cake brought a lot of sanity to all of us. My oldest child turns 11 tomorrow, and she wants to make this cake again. Thank you for your blog – I’ve enjoyed rediscovering it these last few weeks.
I know there are a bunch of comments on here, but I also wanted to say I had significant issues with the caramel layer. I ended up making four batches (two total failures were my own fault) before ending up with one that MAY work. I haven’t actually assembled the cake yet, but I hope it will be ok. Cooking up to 245 made a filling that is WAY too hard, like solidified completely in a bowl hard. I made one that went to 230 that also pretty much completely solidified at room temp before making one final batch to 220 that seems like it may be ok. But it has been sitting out on the counter to cool to room temp (never went into the fridge) and is it extremely far from spreadable. If I poke the top it will dent, but that’s about it. I expect I’ll have to warm it up to spread it on the cake, though I hope it will be delicious once done. Just FYI for those coming after me.
You definitely want to warm it up if it’s gotten too hard to spread it. The caramel is intentionally on the firm side. When it sits on the thin frosting layer within a buttery cake at room temperature, it becomes exactly right — not hard but not runny.
We made the cake last night with the 220 caramel and it was perfect! The cake was truly amazing and the caramel really was the star. If I make this again I may make a batch at 245 and one at 220 to see how they both behave. But even once in the cake the caramel remained pretty solid and never got to the “dripping down the middle a little bit” stage. I’m having another piece now (the day after) with my morning coffee and it seems perfect!
Made this wonderful cake for my backyard microwedding. It was a labor of love and involved at least one small temper tantrum but turned out so great. A few tips:
– I made 4 round tiered layers, 9”, 8”, 6” and 3”. Imperfect but worked. Same measurements as written and worked great. Didn’t time them but eyeballed it and took them each out when needed
– Cut each layer in half and put the caramel layer between each
– Caramel took me 3 tries and I found it to be a huge pain as the sugar crystallized. I overcooked it to 250 degrees and it was basically hard toffee but my brother resurrected it by adding small amount of bourbon to it (the alcohol helps, apparently!) in the micro. Texture came out perfectly.
– Increased caramel by 25% (made way too much) and frosting by 50% (just enough, with flower decor). Frosting is divine.
Was a fun family affair! Thanks for a delicious recipe, Deb! Best cake I’ve ever had
Congratulations! This sounds perfect.
I don’t have any powdered milk. Could I use powdered buttermilk, such as Saco, to achieve a similar result?
SO, reporting back — powdered buttermilk absolutely worked fine for the brown butter. I was nervous because Deb responded elsewhere recommending against malted milk powder, but the nutritional profile for powdered buttermilk vs powdered milk was just about the same, and I couldn’t imagine more buttermilk flavor would hurt. I ended up doing another trial batch with whole milk powder, and the result seemed pretty identical.
WARNING — while it works for the brown butter, under no circumstances should anyone else waste good ingredients trying to substitute powdered buttermilk for the liquid buttermilk here. I tried first adding it with the dry ingredients and adding water when the recipe calls for buttermilk, as recommended on the packaging, and ended up with a very liquid batter and unsurprisingly flat cake. I tried again adding reconstituted powdered buttermilk when called for, and got the same result. I should have put together the first time that the issue was probably that the powdered buttermilk doesn’t provide the acidity needed for leavening, but I figured that out the second time. My third try, using whole cultured buttermilk, worked like a dream.
Two other notes:
– DO NOT try to use the Flex Edge beater with your KitchenAid for this recipe — it’s simply too effective at enthusiastically mixing this much flour (which got everywhere) and batter (also got everywhere) even on the lowest setting.
– my batter kept separating (curdling? splitting? getting grainy) when I added the vanilla extract, and I couldn’t get it to come back together even after mixing longer than I otherwise would. It baked up fine, though.
Have only tackled layers so far, but excited to fully assemble! On the plus side, I have plenty of pancake-flat practice layers for trial decorating…
Wonderful! Even I tried something similar:
EGGLESS CHOCOLATE CAKE
How do you think this cake will cope if someone was to…say…mix in some rum soaked raisins for a rum’n raisin type cake?
I think it can handle it, but I’m not positive that they won’t sink so it’s best to try a small version of the cake as a test.
I made myself this cake for my birthday this year! But with just two of us in the apartment and safety keeping us from inviting folks to celebrate, I made a smaller cake: ½ recipe of cake, ⅓ recipe of both caramel & frosting. It was a perfect two-layer 6″ cake, plus 5 lovely cupcakes to share with friends when we go for a distanced apple picking adventure tomorrow. I frosted it simply, and had about a half cup of frosting and a couple tablespoons of caramel left over. Thanks for the great recipe & guidance!
I made this for my birthday but struggled with the caramel. When it was cooling down (the first time), a lot of the butter separated out. I put it in the fridge to store overnight, and then tried to rehab it the next day. On the advice of other commenters, I tried to reheat it on very low heat while stirring, and then added a splash more heavy cream. This seemed to make it come back together! But as it cooled the second time, even though it didn’t separate again, it really chewy and hard at room temp. I used it in the cake anyway – it tastes good, but when it hit the frozen cake layers basically turned into caramel brittle! If I try this again, I was thinking of using the caramel filling from the pretzel linzer cookies in SK Every Day. I have made that before without incident, so I think the inclusion of golden syrup makes it a bit more forgiving!
But the cake and frosting were really delicious here – thank you Deb!
I’m sorry the caramel gave you trouble? How was the caramel texture once the cake was served? My goal was it to be firm when cold (and certainly hard in a frozen cake) and soft when you eat the cake, but no so soft that it runs out and you have an empty cake.
It was pretty crunchy haha! Maybe I didn’t stir enough, or heated it too high? (My thermometer is an alcohol one, not an instant-read, so hard to read super accurately and might be the culprit.) I’m hoping to try again soon!
I haven’t made this cake or any other large, tiered wedding cake. I just wanted to offer a thought for those intent on having homemade cake at their wedding: have a cake buffet! It’s what we did. We figured we needed 10 normal-sized cakes for our expected headcount; figure out which 10 types of cake we wanted to have, figured out which ones should be homemade and which purchased, and invited some close friends/family to bake for us. No one had to make anything larger than a typical cake they’d made before, and no one had to eat fondant-covered bakery wedding cake, and WE didn’t have to pay the upcharge for saying the cakes we did buy were for a wedding. Guests loved it, we loved it. 10/10 would do it that way again.
Deb, do you use the same custard frosting for the decorations, or do you recommend a more “traditional” buttercream for decorating? Thanks!
I used the same but you can use a basic one and save some energy.
Toay I came for coleslaw, I was side tracked by ginger squash and tofu and ended up here where I belong .
It’s covid I have no one to bake this for and my husband and I have chubbed up during the last 9 months.
But I’ll figure something out.
Maybe I’ll distribute to the neighbors.
Stay safe
Haha, I’m feeling all of this 100% Carol.
Could I put this salted caramel on top of a (baked) cheesecake?
It’s a bit thick for pouring. I might use something closer to this sauce, cooled down, of course.
I am going to make this for a birthday cake for my nieces first birthday at the weekend. The party is at 2pm. How long before this should I have it ready? I don’t want the cake to still be frozen but also don’t want the icing to melt?
You should give it 24 hours in the fridge if it’s already filled and stacked. If it’s a single unfrosted layer, it can defrost in under an hour at room temperature, usually.
Would the recipe halve well for a smaller cake?
Absolutely
Do you think this frosting and filling would go well with a white cake?
Yes!
Hi Deb – long long time reader and first time commenter.
I made this and it was one of my most favorite recipes of yours.
A couple of things:
– when making the frosting, you say it is fine to begin it cold. However, my butter seized up, refusing to incorporate and I had to warm it in a bath so get a homogeneous consistency. Suggest making that edit.
– again when making frosting, I was trying it continually as I incorporated the butter and ended up calling it done after mixing in only about 300g of butter. This is just personal preference.
– for your website functionality, I’d like to suggest that you have a Reddit-style voting system. I find it kind of annoying to scroll thru 1000 comments which are just random thoughts on the recipe. Even the comments are in “I made it,” the best ones are not necessarily at the top.
I’ve made this cake 3 times now by request for birthdays and it’s the only cake I’ve ever made to disappear entirely at a party!
My notes to other readers–
1) I’ve never used the milk powder and haven’t missed it
2) the caramel filling worked perfectly, heated to barely 245. I strained mine since a few sugar crystals formed and it was smooth and perfectly fudgy upon cooling. I once used half-and-half in place of the heavy cream and it worked great too.
3) Freezing the layers is NOT OPTIONAL before trimming/stacking/frosting… I found the cake is so tender and deliciously crumbed that it is structurally not very strong and freezing is the make or break difference for assembly. Please please please freeze before assembly!
4) I adore this frosting, but personally I find it to have a very smooth, butter-like mouthfeel… if you’re used to grainier, fluffier buttercreams be aware it is smooth and butterlike instead. It is thick but if the cake is frozen I find it goes on just fine with no warming.
5) CRUMB COAT CRUMB COAT CRUMB COAT before frosting for the smoothest, lovliest surface! It’s the next best thing to fondant in terms of a smooth canvas for decorating and a non-skippable step for this thick frosting and delicate cake.
I made this cake for a family birthday and it was incredible! Every part of this cake is delicious and it all comes together so well. I made the frosting ahead of time (butter included) and when I took it out of the fridge, sat it on the counter for 2 hours and re-whipped it, it curdled and I absolutely panicked. I did some internet sleuthing and tried the trick of microwaving ¼ of the frosting for 10 seconds, and rewhipping it into the rest of the frosting. It was good and creamy and perfect after that!
Deb, thank you for this recipe. After a really grim year I wanted to really treat myself for my birthday today. I read this recipe, read the comments multiple times, and made each stage separately over a week which made it much less intimidating in scope. It was a total triumph. Family members fighting over second slices. Here’s what I learned from baking a triple layer 6 -incher (halving the recipe above) :
1) the cake layers are DELICATE. Flip them out of the pan using the parchment paper. Freezing is non negotiable for stacking the layers. If you do tear one, and I did, freezing it will stick it back together.
2) the comments made me nervous about making the caramel. I had a thermometer but has no idea if it was touching the pan. So I let the caramel heat to approx 220. In the corners of the pan where I had not whisked, the caramel had turned to brittle. Whisk constantly.
3) when reheating the caramel from the fridge, reheat less than you think you need. I needed 15 seconds in total. Dig in, stir with a spoon, you want a very thick caramel. One that a spoon stands upright in.
4) the custard gets thick VERY FAST. Have faith, it’s all going to be ok! Stir constantly. Any bits you miss stirring will burn at the bottom. Keep a close eye. Do not answer the door to couriers. The custard might look alarmingly lumpy – keep stirring.
5) I was after the homemade look so didn’t level the layers. It still looked great. There was enough caramel and frosting. No leftovers of either. And I didn’t skimp.
It looked fab and tasted next level. It’s easily the best cake I’ve ever made. My food-critic 7yo declared yesterday it “sounded a bit boring” yet today was begging for thirds. Thank you Deb. Fun from start to finish.
“For a 6-inch tier with exactly the same height as the 9-inch tier (4 1/2 inches), you’ll want to halve this scaled up 9-inch recipe. For a 12-inch tier, you’ll want to double the 9-inch. For everything in between and/or over, I’ve described above how I do the math.”
Could you confirm for a wedding tier sized cake for a 12inch tier, I am to double the original 9inch recipe or am I to double the ‘scaled up’ 9inch recipe?
Thank you!
Yes. A 12-inch round cake pan holds twice what a 9-inch round does, and four times what a 6-inch round does.
What a recipe! Deb, or if anyone else can attest—is this still celebration-worthy sans caramel? Brown butter cake robed in custard creme sounds perfectly elegant if the flavours stand up.
Hi Deb,
Thank you for answering my previous question. I have one more for you!
When making the 12inch Wedding size with the taller layers, by how much should I increase the custard frosting from the original recipe; should I double it?
And do I double the Caramel filling?
If you’re not increasing the diameter of the cake, no need to increase the filling. For the frosting, it depends on how much taller it will be…
I am making a 12 inch wedding tier, a 9 inch wedding tier and a 6 inch wedding tier. (cake batter for the tiers using your math for the higher layers) x 1.5 for the 9, double that for the 12 and half for the 6.
I am doubling the salted caramel recipe for the 12 inch, obviously keeping the original recipe for the 9 inch and halving the original for the 6 inch.
As for the frosting, if I make 3 whole batches of the original 9 inch recipe, my math of the surface area to be frosted says it should just about cover the whole lot. Does this sound about right to you?
Hi! What eggless frosting would you recommend with this cake?
This was, hands down, one of the best cakes I’ve ever made. I made it for my SIL’s baby shower (and if ever there’s a time to make a good cake, it’s for someone who’s pregnant), and I had to very specifically “hide” a slice to take home for my husband – hah!
Two notes – I DEFINITELY think this could serve more than 12-16. The shower we threw for her had about 25 people there; two were GF so they didn’t have any, but everybody else had some and a few people wanted to take leftover slices home. (Actually, everybody wanted to take some home, but see above about me hiding/hoarding a slice for my husband… and of course leaving some with my sister and brother. ;))
Second, I think this was the best salted caramel sauce ever. Usually it takes me a lot of troubleshooting to make caramel – it’s very frustrating – but I followed Deb’s instructions to a T and it was perfect. The recipe worked exactly as written, and the flavor after splurging on good butter and using some of my cherished Maldon sea salt flakes… ugh. Perfection. I think I may need to make more for ice cream, oh, all the time now.
Deb, thank you for all the time and energy you spent developing this recipe. I am sure it was a joy to give your friends such an amazing gift, and thank you for sharing it with all your readership, too. (And if you happened to notice a serious spike in website views last week, hellooooo, that was probably me obsessively reading this 6000+ word post and every.single.comment three million times over.)
Love this cake! But I want to make it rectangular for a shower. How can I do this?
If you’d like 3 layers at the same height, double everything.
I made this wedding cake for a small family wedding this summer, and everyone thought it was the best cake ever eaten! I did a practice cake, and learned an interesting lesson about baking powder. On my first cake trial, my husband loved it, but all I could taste was baking powder- something that has happened to me before with diner pancakes and the occasional biscuit. Turns out 1 in 3 people (including me) have a sensitivity to the sodium aluminum sulfate in regular double acting baking powder. Luckily, Bob’s Red Mill sells an aluminum free version, and the problem was solved! I also learned that the cake was better the second day, as the fruit filling made the cake more moist.
I frosted the final cake with Deb’s Swiss Meringue Buttercream, but made with brown sugar to relate to the toasty brown butter flavor of the cake. And added a little salt to the buttercream. Cooked down ripe Michigan peaches to make fruit filling, and assembled the day before so the jam and cake could become friends. It was so divine.
Quite literally the best cake i’ve ever had. The cake itself, the caramel, the frosting – absolute deliciousness. Thank you <3
Just made this yesterday, not as a wedding cake but just as something that sounded delicious. Oh my goodness, so luscious. I give lots of encouragement to keep going while making the caramel. It was a first time for me and I had trouble getting sugar melted and had lumps, etc. However after stirring in the butter and cream it turned out fine.
Hello, I’m planning on making my own wedding cake and after much research I think your recipe is the ONE! It looks really great. I’ll practice before though :) I noticed that often bakers add simple syrup to each cake layer as they assemble the cake to keep it moist, but there’s none in your recipe. Is it because this vanille cake is more moist? Thank you
I did not find it necessary but it’s entirely up to you. Do a little test cake; see how you feel about the moisture and plan from there.
What an inspirational recipe! I think this would make the loveliest addition to season 3 of the SK YouTube Channel 🙂 After seeing you create it, I’d feel more inspired to try. (Although your written instructions are always spot on!)
looks fab! Anyone have suggestions on a filling that goes well with this that isn’t salted caramel? making this as a bday cake and my friend loves browned butter but isn’t a huge caramel person.
I cooked down a bunch of peaches into a jam layer and it was divine. Pear might be good for something more seasonal.
Hi Deb, question about the frosting you used for the flower decorations … Did you make additional batch of frosting for the flowers OR was there enough of the Vanilla Bean Custard Frosting left over to make flowers. If you made additional, did you use VBCF or just basic American Buttercream? Can the VBCF stabilized enough to make flowers out of?
I used the frosting from the cake because I had made enough but you can absolutely just use a simple buttercream instead. I did that when I made a similar flower garden on this German Chocolate Cake. You won’t have any trouble piping this. You can watch a demo here: https://www.instagram.com/stories/highlights/17926739992364547/ The flower part is about 2/3 the way through the demo.
I made this as a birthday cake with coffee in the sponge and caramel (I used espresso powder in a tiny bit of water) and it was INSANE
I ended up here after clicking “Surprise Me!” just for grins over morning coffee. I, too, have made three wedding cakes, and have lived to tell the tale. Never, will I ever, tackle three tiers again. It was lovely, but took several years off my life, which was not entirely the cake’s fault. Huz and I were also the MOH/Best Man and, uh, hosted the rehearsal dinner. At our house. We weren’t entirely mad, we did have that catered.
I think the best part of that whole maneuver was having a cake tasting for the couple. This was a second marriage for both, and their first weddings had been put-together-quickly-backyard-budget non-affairs. They were so thrilled to be able to plan a real celebration (and afford one!). I used the Chocolate Celebration Cake from your first wedding cake post, filled with salted caramel SMB (I cheated and used flavoring drops for that). That was two tiers. For the middle tier, I found a wonderful white chocolate layer recipe somewhere, filled with apricot and raspberry fillings, and the whole shebang was coated in Earl Grey SMB. The caterer knew how to slice a tiered cake, thank goodness, ensuring that we all could leisurely sit over leftover cake at the couple’s home next day and relive it all. I did save all my notes, though I have vowed Never Again – at least, not three tiers. I don’t know as I’ve ever thanked you properly, Deb!
Suggestions on how best to push this in a dark chocolate direction? I offered to make a bday cake for friend and *I* really want to make this cake but *she* requested dark chocolate. I’m thinking a big puddle of ganache draped on top, similar to the SK PB Cake or the Hazelnut Brown Butter Cake, or would it make the frosting sag? I saw someone put thin layers of ganache in between. Debating whether chocolate will do amazing things to this recipe or if it would be too much, and I should just go with one of the many SK chocolately-chocolate cake recipes (and actually let my friend get her request).
I was recently referred to your website by another blogger. I can’t believe what I’ve been missing out on! I love your, (vegetarian), recipes! I absolutely love the way you write! What a blessing to have found you. I will happily share your blog with all of my foody-friends!
The flavors of this make it just about the most *me* cake I’ve ever seen, so I knew I needed to try it for my birthday, when I love to make myself a big elaborate cake. By and large, it didn’t disappoint! The brown butter cake was amazingly fragrant and lovely, and the reverse-creaming process really does make a flatter cake, so I appreciated not having to trim off domes. The layers seemed quite thin when they came out of the oven, but when they were all filled and stacked they made a substantial cake. (Perhaps the same recipe baked in 8-inch round tins would have given the height I expected?) The custard frosting didn’t blow my mind quite as much as I hoped it would, though it’s silky and decadent and so easy to work with. I upped the sugar to 1 1/4 c, since I’ve learned that your idea of pleasantly “not too sweet” usually translates to not sweet enough for my taste, at least when it comes to frosting! The caramel was nearly the death of me, and I should have trusted my instincts that 245 was way too high for the desired effect (or else my candy thermometer is busted or just completely uncalibrated.) The first time, my test dribbles of caramel turned into hard candy. Luckily I remembered reading that if you take caramel too far you can just cook it again with some water added back in, since cooking the water out is what changes the caramel structure and allows the sugar to reach a higher boiling point in the first place. Fortunately it worked perfectly, even the time when it had cooled completely and I attempted re-warming only to have all the butter immediately break out of it. Ultimately it took four tries, but once I got it right, the caramel filling was absolutely the star of the show — maybe all that extra cooking made it so dark and rich and complex!
How can I turn this into cupcakes? Specifically I’m worried about the caramel melting of I use it on top of the cupcake so I’d like to fill the base with caramel but I’m not sure how. Pastry bag? Cut the top off with a knife?
In my S’more Cupcakes, I remove some of the center with a melon baller. But, you could also take some out with just a paring knife.
Thank you for this amazing recipe and the incredible tutorial you give with it. I’m a complete amateur who makes for fun and, for reason, volunteered to make my brother’s wedding cake. You are the reason it was a total success. Everything went together beautifully (even with a very sudden heat wave the day of!) And it was so satisfying to hear people say “I can’t eat anymore, but I HAVE to have more cake.” ” This is the best cake I’ve ever had in my life.” And I happily have you credit at every chance. Thank you so much!
Would it be good with just a white cake ?
Thanks for responding! I’ll give it another try and see if maybe it was just an ID-10-T error😂
How to make a 6 inch test version?
I made this as a 6″ wedding-style cake and followed your directions for scaling it down from a 9″ celebration-style, but I have a question. My layers took a really long time to bake (90min), and when I took them out of the pans they were very oily. Was there some step I missed regarding the bake time for the wedding-height layers? And is the cake supposed to be oily? Lastly, my layers sank once they came out of the oven–do you have any thoughts about any of my struggles? Thank you!
Something sounds very off to me, honestly. 90 minutes is a wildly long time for a 6-inch cake to bake. Mine would normally be done in 20-30 minutes. It shouldn’t be oily, or not more than another layer cake.
Thanks for responding! I’ll give it another try and see if maybe it was just an ID-10-T error😂
If we are too intimidated to make a brown butter cake any other suggestions? A white or yellow cake
It’s been nearly a year since I made this for my wedding cake, so I figured it was high time to leave a review! I decided to skip the caramel after hearing tales of woe throughout the comments (no need for any extra stress when making your own wedding cake!), but just the cake and frosting on its own was lacking a little something — so my solution was to make a double batch of the custard, use half to make the frosting as written, and use the other half as filling between layers. Worked like a charm and turned out flawlessly delicious! Everyone had multiple helpings and there was still plenty left over for us to enjoy — it’s definitely a cake I’d keep coming back to even if it didn’t have extremely pleasant memories attached to it (and maybe on one lower-pressure day I’ll give the caramel a shot too!).
I made this to celebrate our first wedding anniversary! The cake and frosting were amazing, but I couldn’t get the caramel to work at all (it kept seizing up), so I made a peach compote instead. I also tried making buttercream flowers with the frosting but it wasn’t stiff enough. Admittedly it was one of the most hot and humid days of the year, so that probably had something to do with it. I didn’t include milk powder but still thought the flavor and texture of the cake was incredible!
My son is getting married in November in California (I am in Boston) and I am making the wedding cake. There is a first time for everything! This post was so helpful and I have a few questions.
Does it matter whether you use a pan that is 2” or 3” deep? How does that affect the math?
Do you split the layers of the cake or just make 3 cakes for a 3 layer tier?
Thank you in advance for your response!
I bake layers separately. The pan depth is mostly about how much batter you need to put in but if you’re unsure there’s no harm in having deeper pans.
If I want to turn this into a 6”, 9” and 12” tiered wedding cake how do I adjust the salted Carmel and the frosting? I would need enough salted caramel to fill all three tiered cakes + enough icing to cover all three tiers. However, my couple wants a naked cake. Thanks for any insights.
Joan
In Step 5 in the post, Create Your Final Recipes, I talk about how I scale recipes up and down as needed. It’s… a lot of math! But it always works. Good luck!
Deb,
Before I make this, I want to get the best ingredients. I clicked the link for the Vanilla Bean Paste and the recent Amazon reviews are mixed. This recipe was posted 3 years ago so I’m wondering if you still recommend this product? Or, are you using something different now?
I still use the same brand and I like it but any brand will work here!
I finally baked this cake as my weekend project for a potluck tomorrow at the office. I’ve tasted each component separately, but not as a slice of cake (yet). That’ll be tomorrow. However I expect it to be utterly delicious. The German buttercream is a revelation, itself. To me, it’s the richness and unctuousness missing from Swiss meringue buttercream. And it’s not too sweet. I did have to make the caramel filling twice, the first time it was way too stiff to spread and when I reheated it too much butter leaked out of it. So I re-did that and was way more cautious in heating to temp and stopped just short of 240 degrees. This was much easier to work with and spreadable, but not runny or sauce-like. I did not need to shave or shape any sides or top of the cakes as mine baked up very level and even. I did have to bake in batches (only 2 pans in this household), baking the first 2 layers, then the third. I also scooped two cupcakes, as my offspring would be very disappointed to not have a taste. I whittled out a center of the cupcake to fill with a bit of the caramel. My final cake is not as pretty as yours Deb, because I did not plan well enough in advance to order some additional gel colors. I just winged it with what I had and was OK with it. Thanks for the tutorial about Flowers not from Nature, as it made piping flowers accessible and much much less daunting. The effect is beautiful and most are not going to notice or critique a home-bakers piping (no) skills. And if they do – so what! Thanks for the great recipe and thorough descriptions, as usual.
Hi! I’m making a two tier (8 and 10 inch) version of this for a celebration this weekend. I’ve calculated that a double batch of the original cake recipe should work well for quantities (I don’t need it to be super tall, so I’m planning on relatively modest tiers). Would a double batch of the cake batter fit in a standard artisan stand mixer? Or would you recommend making it in two separate batches? Thank you!!! I’m using (very thick) homemade apple butter as the filling, and using your frosting recipe. I hope it will be delicious!!
For the 6” cake, should I do a half recipe of filling and frosting?
Yes, half of everything.
I made this cake for a birthday in May and it was a hit, so I am using this for my wedding cake this month. My question is about the baking time – is anyone else pulling out liquid cake at 20 minutes? I had to go 15-20 minutes beyond that both times I made this (once as written for three 9″ layers and once as directed to scale for three 10″ layers). I haven’t made the caramel or frosting a second time yet, but I don’t remember having any issues last time.
Update on the wedding cake – this is one of my favorite cakes now. I’ve made it as written twice, and I can’t think of anything to improve. The components are so well designed and work together so well. The cake is moist and has a nice tight crumb, the frosting isn’t too sweet or too much, the frosting behaves well, the directions are great (except for the timing on baking the cake layers)… There were no leftovers!
This cake is quite a project, but in a fun way. The cake, custard, and frosting all turned out well and behaved as promised by Deb. The caramel, on the other hand, was a #$&*-show. I used my trusty and reliable candy thermometer and the caramel was fudge-like as intended, and quite delicious, when I finished it. It then cooled to be almost rock solid. I don’t have a microwave, so I warmed it on the back of the stove with the heat from the oven when I was ready to bake the layers. That caused it to soften around the edges, but not in the middle. I tried to heat it gently in a saucepan, but the butter separated (I knew it would, but was grasping at straws at that point). With a splash of cream, I eventually coaxed it back to a thick, spreadable consistency. Not surprisingly, it hardened again as it cooled. At this point, my partner chipped it into two sections and massaged each section into a disc shape so we could lay it on top of the frosted layers (this is what an engineer does when he sees his birthday cake going sideways!). When it came time to cut the cake, the caramel layers were nearly impossible to cut through, so the ‘slices’ were more of a deconstructed birthday cake than actual slices. The sponge was tender and delicious, the frosting was also good, though I’m not sure I could taste that utterly delicious custard in it, and we picked up occasional bites of caramel taffy as we ate. All in all, it was a delicious mess and one I probably won’t attempt again. The custard, however, I could easily eat a whole bowl of any day of the week!
PS: Deb, fellow late 90s GW grad here. You make us proud :)
I want to use this vanilla custard buttercream frosting, but I want to add brown butter and coffee extract for a wedding cake I’m working on. Would this work — using room temp brown butter for the frosting instead of regular butter?
Yes, it will work just fine.
Been meaning to write for months. Thank you for this recipe. I used it for my daughter’s wedding cake — a 9-inch by 36-inch sheet cake.
Four layers – filled with guava paste, a lovely, not-too-sweet cream cheese frosting (recipe sourced elsewhere), and lemon curd. Frosted with the same cream cheese frosting and topped with fresh and candied fruit and a few chamomile flowers. The cake met all of the desires of the bride and groom.
Would be happy to share a photo.
Thanks again!!